• Skip to primary navigation
  • Skip to main content
  • Skip to primary sidebar
  • Skip to footer
  • Home
  • About
  • Work with Me

Make it with Kate

  • Home
  • DIY Woodworking
    • Building Projects
      • DIY Mudroom Build
      • DIY Corner Coffee Bar Build: Wine Storage, Floating Shelves, Cabinets and more!
      • Staircase Makeover: Carpet to Wood Stairs
      • Fall One Room Challenge 2021: Game Room Makeover
  • DIY Home Decor
    • Furniture Flips
    • Dollar Tree Crafts
    • Small Wooden DIYs
      • 3 DIY Farmhouse Trays to Make
    • Wall Decor
  • Fall One Room Challenge
  • Seasonal
  • Holiday
  • Instagram

ikea hack

Ikea Malm Hack: Flip a 2 Drawer Malm Nightstand

December 2, 2021Furniture Flips

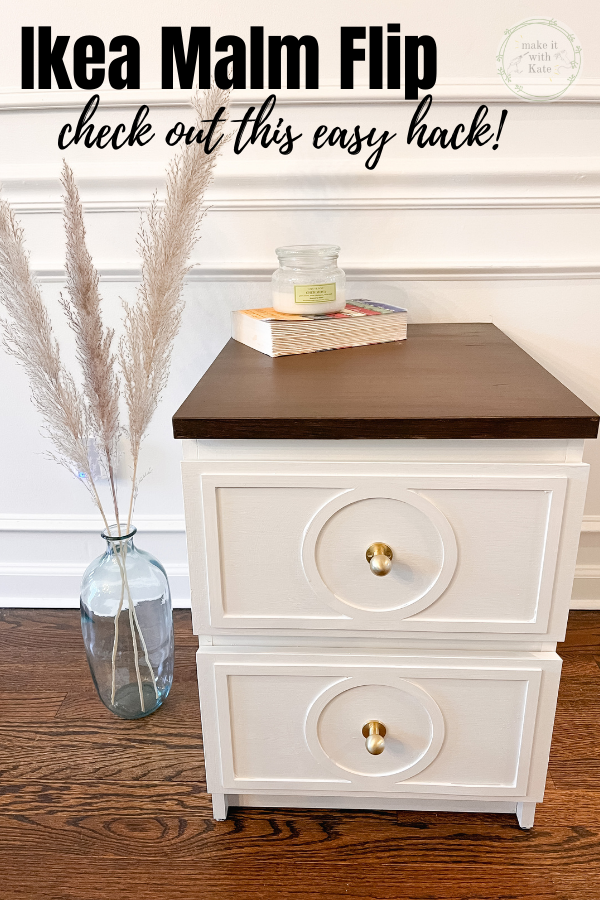
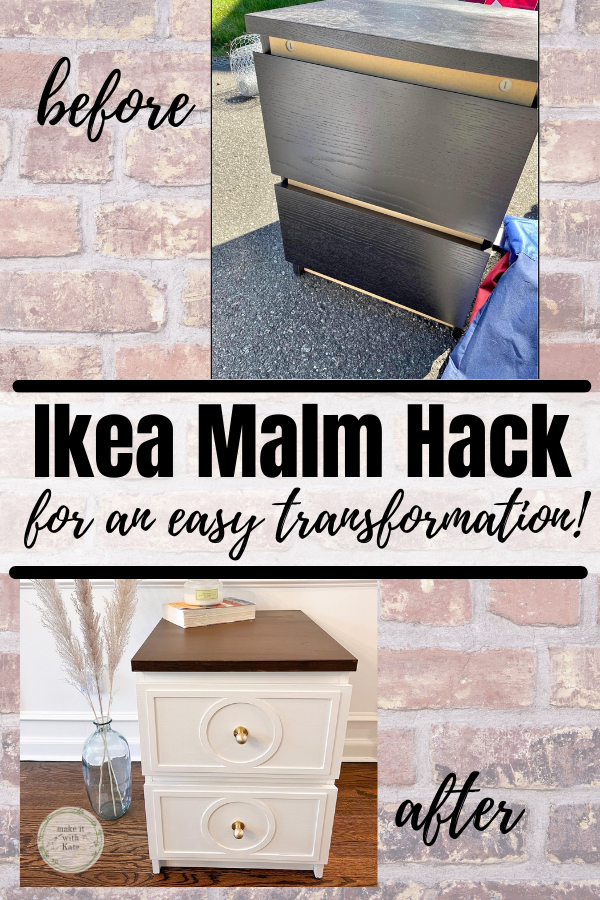
This Ikea Malm hack is so simple. By adding O’verlays to the drawer fronts and a wooden top, this nightstand gets a drastic makeover.

Flipping furniture is a great way to save an item from the landfill while breathing new life into a used piece. This Ikea Malm hack is such as easy way to turn a basic piece of furniture into something really custom and unique. Wait until you see how this furniture flip turned out!

*This post contains affiliate links.

This Ikea Malm hack is so simple. By adding O'verlays to the drawer fronts and a wooden top, this nightstand gets a drastic makeover.

Ikea Malm Hack

Flipping Ikea furniture is popular among DIYers because you can get an inexpensive piece of furniture and turn it into something really nice.

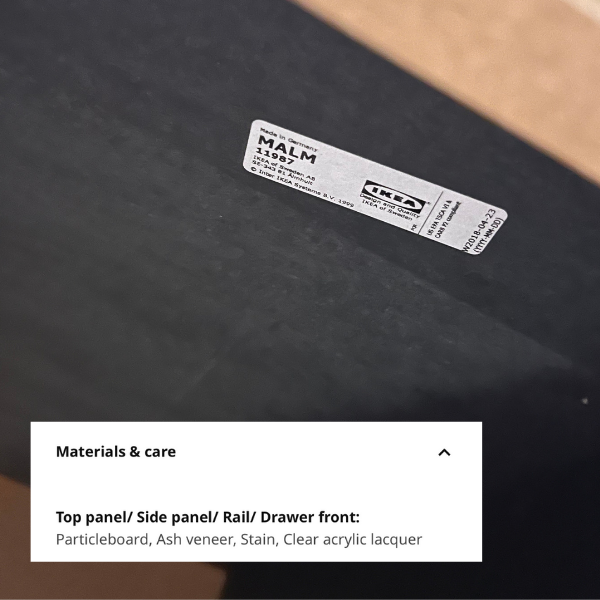
By shopping for used Ikea furniture, I can find pieces that are very affordable or free and can also find all of the information I need about them on the website. Almost all Ikea pieces have a sticker somewhere on the piece of furniture with the name on it. This gives the flipper the opportunity to do a search on the Ikea website to look up the materials used on that specific piece of furniture.

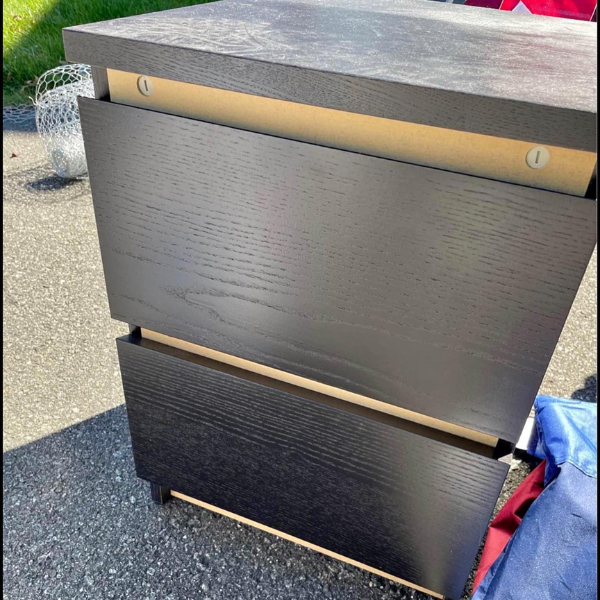
When I search for Malm 2 drawer dresser (their name for the nightstand) I can look under ‘materials and care’ and see that this nightstand is made out of particleboard and clear acrylic lacquer. This tells me that its particle board with a thin layer of veneer and laminate so it can’t be sanded and stained, rather it needs to be primed and painted.

There are a couple of fun hacks for doing both of these that I’ll share with you below.

This Ikea Malm hack is so simple. By adding O'verlays to the drawer fronts and a wooden top, this nightstand gets a drastic makeover.

What you need for the Ikea nightstand hack:

  • Ikea Malm 2 drawer dresser
  • O’verlays Gracie kit
  • Retique it liquid wood
  • Dark walnut gel stain
  • Zinsser Bin Shellac primer
  • white eggshell paint (I used the Upcycle latex paint)
  • foam brush
  • mini foam roller
  • wood glue
  • chip brush
  • drill
  • drawer hardware (I used some similar to these)

How to flip the Malm nightstand with this fun Ikea Malm Hack

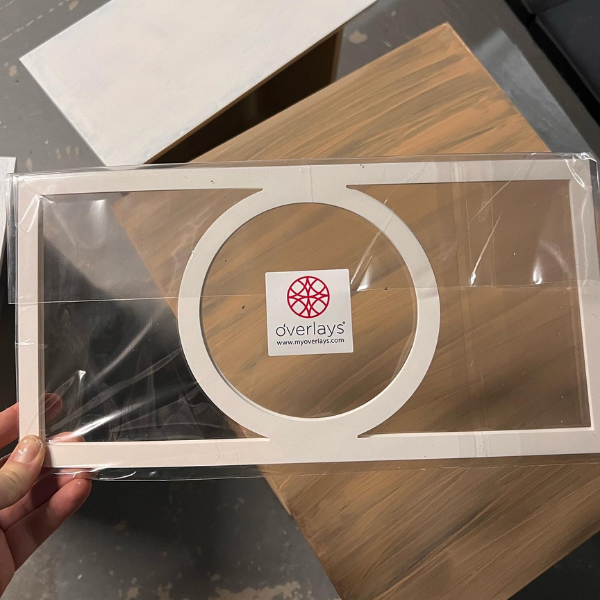
The Ikea Malm hack I’m referencing here is the use of O’verlays to give these drawers an instant update! The Ikea Malm furniture has a flat front to it’s drawers without any dimension or hardware. It’s the perfect blank slate for a furniture flip.

The O’verlays are decorative fretwork overlay panels that come in several patterns and sizes. They are light weight, paint-able and easily attach to furniture. Plus, you can shop their site by furniture type which makes looking for Ikea flips super easy.

This Ikea Malm hack is so simple. By adding O'verlays to the drawer fronts and a wooden top, this nightstand gets a drastic makeover.

How to paint Ikea furniture

Before adding the O’verlays, prep the piece of furniture. For this flip, I want a white paint and a stained wooded top. There are a couple of steps that are essential here since we know this is made out of laminated particleboard and has a black veneer.

Because this is a dark veneer and made out of laminate, it’s essential to prime first. I like to use Bin primer and a foam brush to apply. You might go through a few foam brushes, but the primer will destroy a regular paintbrush so a foam brush is a cheaper way to go because it will need to be disposable.

When priming the furniture, don’t worry about full coverage as some of the black might show through. Think about the primer as just giving the paint something to stick to since it won’t adhere well to the laminate without primer.

Once primed, use a mini foam roller to add one coat of latex paint to the unit and the drawer fronts (not the top).

Create a wooden top on Ikea furniture

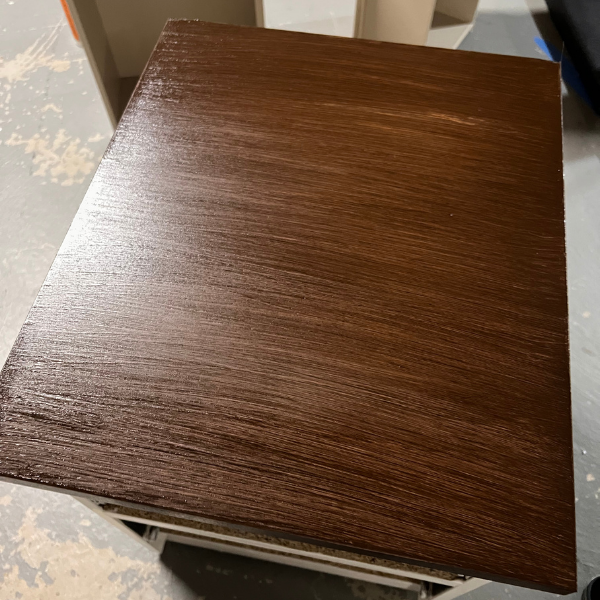
I wanted a wooden look without the laminate look for the top of this. Laminate looks too glossy and less wooden to me so I wanted to turn this top of this nightstand into something that looks like real wood.

Retique It liquid wood is a paintable layer of liquid wood, and it’s so cool! You paint a couple of layers on this liquid wood using a foam brush right on top of the laminate. Once dry, use a chip brush to add gel stain to the layer of wood.

Once dry, this looks like real wood! And gives it an upgrade from the laminate. This will need a coat of polyurethane to seal it once dry.

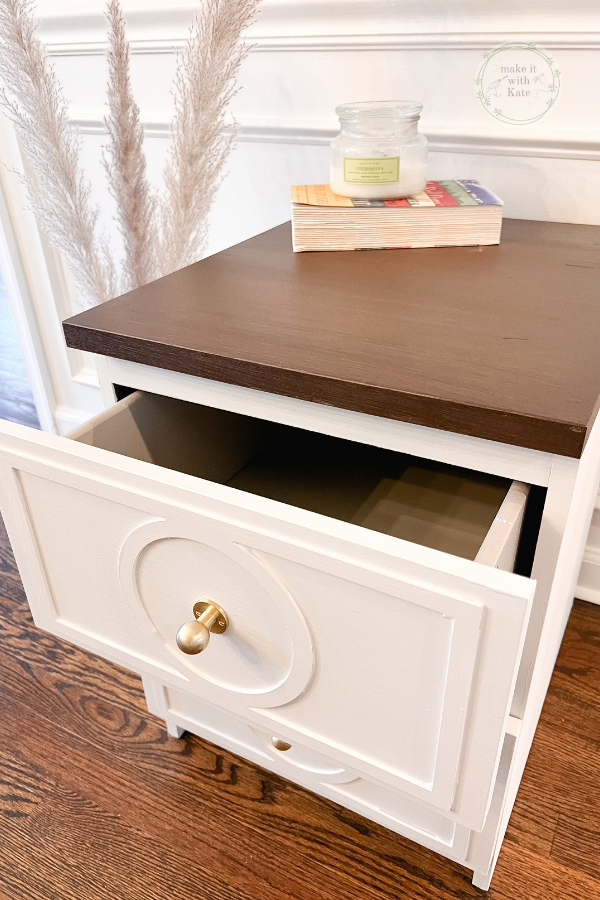
Add the O’verlays to the Ikea Malm nightstand

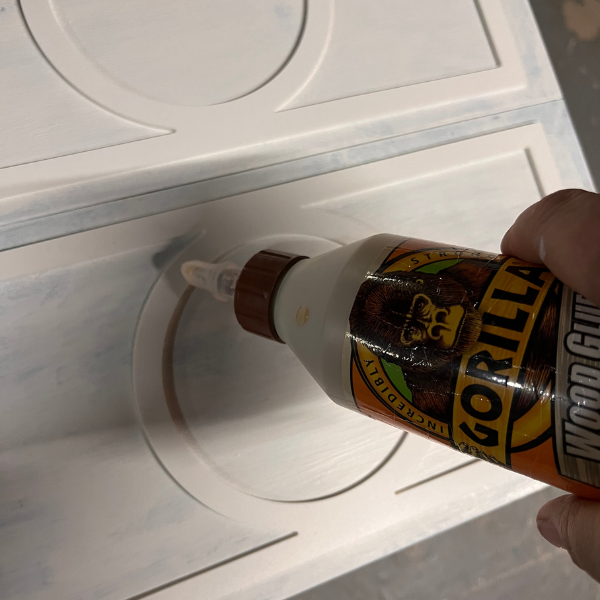
Once the unit has a wooden top, and has been primed and painted with one coat, it’s ready for its O’verlay. This Ikea Malm hack is my absolute favorite. Adding trim is always the extra that makes any project look professional in my opinion.

To attach the O’verlay, simply add wood glue to the O’verlay and place it on the drawer front. Once dry, give the unit another coat of paint, painting the O’verlay as well.

Once dry, add your cabinet hardware to the drawer fronts.

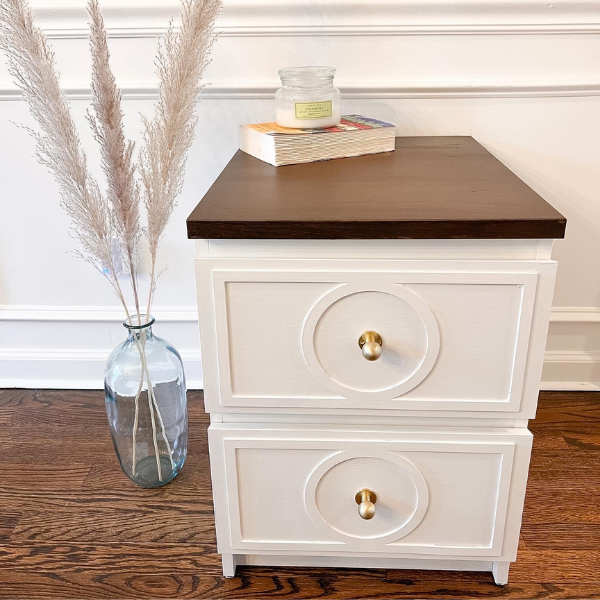
This Ikea Malm hack is the best upgrade to the Malm nightstand

I just can’t believe what a difference these couple of small additions to the Ikea Malm nightstand made. An incorrectly assembled Facebook Marketplace find to this finished product is just my favorite kind of flip. It’s such a dramatic end result!

This Ikea Malm hack is so simple. By adding O'verlays to the drawer fronts and a wooden top, this nightstand gets a drastic makeover.

More Furniture Flips to Check out:

Disclaimer: I received these O’verlays for free in exchange for the promotion of this product. All opinions expressed are my own.

Primary Sidebar

Search for what you need

Welcome!

Find inspiration for DIY home projects and crafts on a budget! You can usually find me with either a hot glue gun or a can of spray paint in hand 🙂

Get social:

  • Instagram

Recent Posts

  • 7 Easy DIY Fall Centerpieces
  • Fall House Decoration to Add Warmth
  • DIY Stair Runner with Corner Turn
  • DIY Stair Risers on a Budget
  • Painting and Staining Pine Stair Treads

makeitwithkate

🪚 Transforming builder grade into modern colonial
🔨 DIY builds and decor
🪑 Furniture flips

Make it with Kate | DIY Blog
Sometimes, you just have to go for it. 🔨 🪚🪛
The number one question I got asked about this pro The number one question I got asked about this project was where this runner was from so I thought it deserved it’s own post: ✔️RUNNER DETAILS
.
.

❇️ it’s from Amazon…and it’s washable 🤯 you can find the link in my bio > shop my pictures OR by checking out my ‘stair runner’ highlight for the direct link
❇️ I bought two 2x12 runners and then cut the ends at a 45° angle and joined the seams with carpet joining tape for the turn (step by step in ‘stair runner’ highlight)
❇️ I have a rug pad cut into strips and attached with carpet tape to each tread under the runner, and the runner is attached with a staple gun- all of these also linked in my @liketoknow.it which can be found in my bio under shop my pictures
.
.
.
Any other questions I can answer??
Before >>>> After! Are you team carpet or team woo Before >>>> After! Are you team carpet or team wood?? This staircase makeover took a few days but it was quite the budget friendly makeover and I’m happy with the outcome! #diyhomedecor #diyprojects #staircasedesign #staircasemakeover
So tell me…are you team carpet or wood stairs?? So tell me…are you team carpet or wood stairs?? #staircasedesign #staircaserenovation #woodstairs
Adding this runner to the staircase really gave it Adding this runner to the staircase really gave it a nice finishing touch. See how I tackled the right turn in the staircase by cutting and joining the two runners. Find this runner linked in my @liketoknow.it
Here’s what the middle of this #staircasemakeove Here’s what the middle of this #staircasemakeover looks like! The treads are stained and we are making some DIY risers to give it a clean look. Lastly, they need trim and some final touches and they’ll be done! #staircasedesign #diyhomedecor #diyprojects
I really wanted to try to stain these pine treads I really wanted to try to stain these pine treads before just painting them black but my stain just wasn’t coming out right. I tried an idea and ran with it and I’m loving the look of this paint/gel stain combo! This is a progress reel…so let’s see if this plan sticks! Stay tuned :) #staircasedesign #gelstainstairs
I’ve been wanting to rip this carpet up for a wh I’ve been wanting to rip this carpet up for a while now….today is the day I decided I can’t wait any longer. I have more involved plans for this staircase so for now I’ll be doing a budget-friendly update here! Stay tuned to see how it turns out 🙃 #staircasedesign #diyhomedecor #diyprojects #staircaserenovation
I love the look of garland on a mirror, I think it I love the look of garland on a mirror, I think it adds a nice touch to my holiday decor! These @command hooks and clips are perfect for making this a nice easy project that packs a punch! #holidaydecor #christmasdecor #diyhomedecor
I thought I would try something new on my front po I thought I would try something new on my front porch this year because there are just too many holidays to decorate for in a row here. I got this prelit garland from #zulily to use as a base for my porch decor for these next few holidays. I kinda like how it turned out! Plus, I can light it up at night :) #ad #frontporchdecor #falloween #holidaydecor
The board and batten entryway is done! Well…stil The board and batten entryway is done! Well…still the last 5% to do but that’s how my projects go ;) What do you think about the color?? It’s Pashmina by @benjaminmoore #diyhomedecor #boardandbatten #diyblogger
This board and batten entryway is almost done! Che This board and batten entryway is almost done! Check out some tips and tool for paint prep, and painting! #boardandbatten #moderntraditional #modernfarmhouse
Load More... Follow on Instagram
Copyright © 2023 · Make it with Kate · Hearten Made ⟡
Cleantalk Pixel