• Skip to primary navigation
  • Skip to main content
  • Skip to primary sidebar
  • Skip to footer
  • Home
  • About
  • Work with Me

Make it with Kate

  • Home
  • DIY Woodworking
    • Building Projects
      • DIY Mudroom Build
      • DIY Corner Coffee Bar Build: Wine Storage, Floating Shelves, Cabinets and more!
      • Fall One Room Challenge 2021: Game Room Makeover
  • DIY Home Decor
    • Furniture Flips
    • Dollar Tree Crafts
    • Small Wooden DIYs
      • 3 DIY Farmhouse Trays to Make
    • Wall Decor
  • Fall One Room Challenge
  • Seasonal
  • Holiday
  • Instagram

DIY Tiered Tray for Home Decor

January 8, 2021DIY Home Decor, Small Wooden DIYs

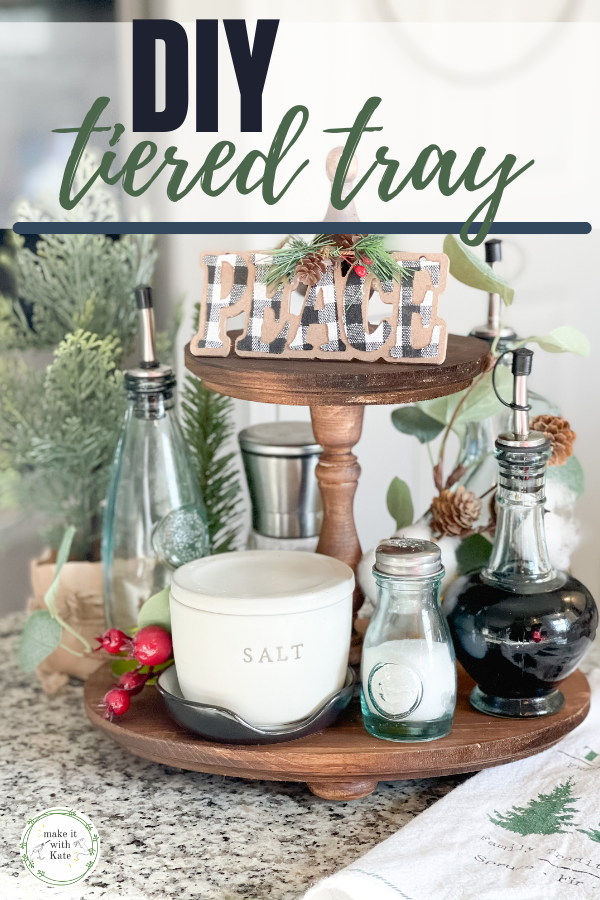
Using a tiered tray with your home decor can allow you to display your seasonal or holiday trinkets in a really cute and non-cluttered fashion. This DIY tiered tray uses a handful of small unfinished wood finds to stack and create a fun tiered tray.

This is a great DIY home decor beginner woodworking project, that doesn’t actually include any power tools.

Related: 3 DIY Farmhouse Trays to Make

This DIY tiered tray layers and stacks unfinished wood pieces to make a beautiful multi-level tray for seasonal or functional decor! #diydecor #woodworkingforbeginners #diyhomeprojects #tieredtray

DIY Tiered Tray

Tiered trays are super popular among farmhouse decor enthusiasts. They are great for functionality or simply for home decor.

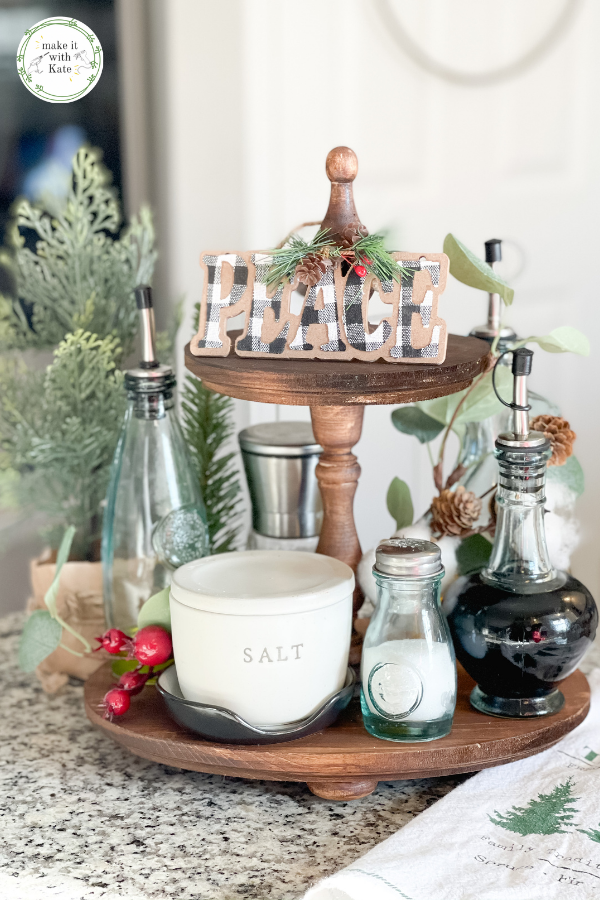
I like to decorate mine with seasonal or holiday items, and have also used it in the kitchen to house spices and oils near my stove.

Browse the unfinished wood project aisle in your local craft store such as Michaels or Hobby Lobby and play around with the stacking to get a design that will best fit you needs.

I went with an oval base rather than a traditional round because I didn’t want it to stick out quite as far on my kitchen counter and really wanted the height.

This DIY tiered tray layers and stacks unfinished wood pieces to make a beautiful multi-level tray for seasonal or functional decor! #diydecor #woodworkingforbeginners #diyhomeprojects #tieredtray

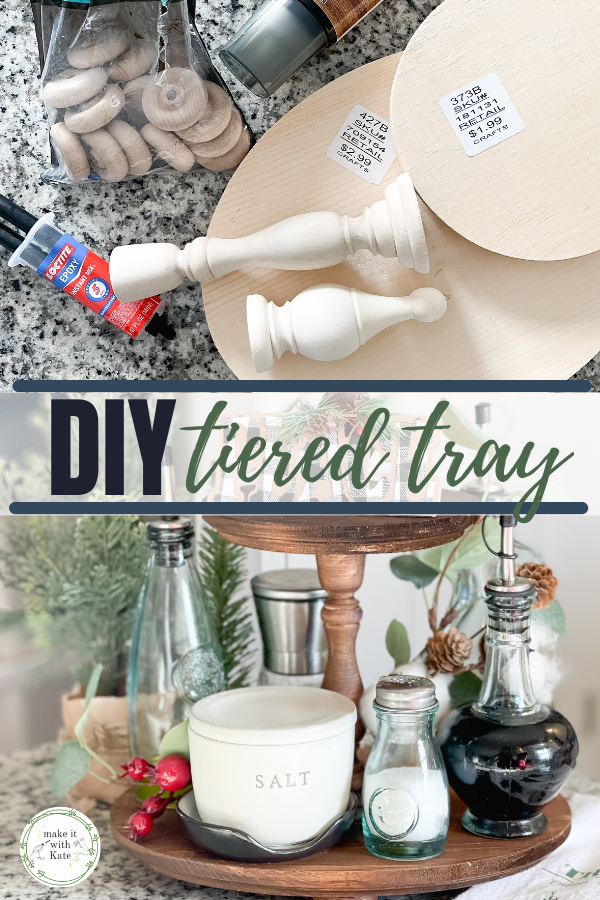
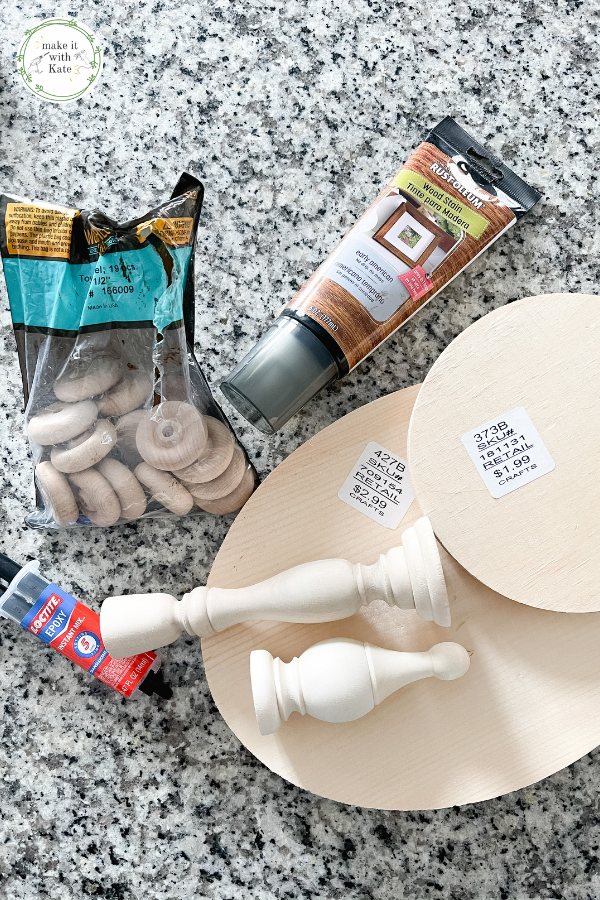
What you need to make the DIY tiered tray

  • 2 unfinished wood rounds, one bigger than the other
  • an unfinished wooden candlestick
  • wooden beads or wheels for feet
  • a wooden finial
  • hot glue
  • wood stain (I used Rustoleum Early American)
This DIY tiered tray layers and stacks unfinished wood pieces to make a beautiful multi-level tray for seasonal or functional decor! #diydecor #woodworkingforbeginners #diyhomeprojects #tieredtray

How to make the tiered tray

Begin by messing around with the placement of all the pieces to get the look that you like.

I like to mark each piece with a pencil so that I can find the center of the rounds when glueing.

If hot glue doesn’t work well for the pieces that you have chosen, try E600 glue instead and give lots of drying time before staining.

Assemble the tray

Begin by adding wooden beads or toy wheels to the large wooden round with hot glue to serve as feet.

Find something with a flat bottom, if there is any wiggle room once these are on and the glue is hard, sand them down until the base feels secure.

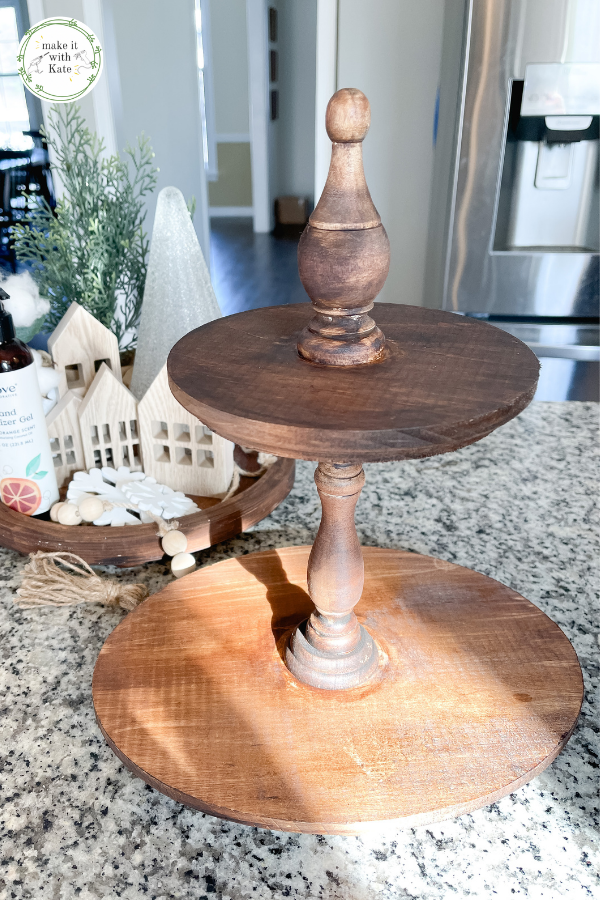
Glue the candlestick to the middle of the bottom round and let dry.

Glue the smaller round to the top of the candle stick and let dry.

Then, add the finial to the middle of the top round and let dry.

This DIY tiered tray layers and stacks unfinished wood pieces to make a beautiful multi-level tray for seasonal or functional decor! #diydecor #woodworkingforbeginners #diyhomeprojects #tieredtray

I know I repeated ‘let dry’ a lot here, but please don’t skip this step! This will also help you troubleshoot your glue and decide if you need to try a different one instead before the whole piece comes crashing down.

TIP: If your glue is being stubborn and really doesn’t want to hold, buff the area of wood you are glueing with a piece of sandpaper so give it something to hold to.

Once the entire tiered tray is assembled and is dry. Stain it!

Applying stain to the tray

To apply the stain, use a foam brush and then wipe the stain with an old rag or t-shirt to buff.

Rub with the grain of your wood pieces, and watch the beautiful grooves really pop! All of a sudden your basic unfinished wood pieces will really look lovely.

Ta-da! Your DIY tiered tray is complete!

This DIY tiered tray layers and stacks unfinished wood pieces to make a beautiful multi-level tray for seasonal or functional decor! #diydecor #woodworkingforbeginners #diyhomeprojects #tieredtray

Check out our DIY small serving tray and DIY round single tray with handles as well.

Related Posts:

  • Round DIY Farmhouse Tray
    Round DIY Farmhouse Tray
  • DIY Small Serving Tray
    DIY Small Serving Tray
Previous Post: « DIY Small Serving Tray
Next Post: DIY Wall Sconce from a Table Lamp »

Reader Interactions

Leave a Reply Cancel reply

Your email address will not be published. Required fields are marked *

Primary Sidebar

Search for what you need

Welcome!

Find inspiration for DIY home projects and crafts on a budget! You can usually find me with either a hot glue gun or a can of spray paint in hand 🙂

Get social:

  • Instagram

Recent Posts

  • Installing a Tile Backsplash: DIY Corner Coffee Bar
  • Ikea Malm Hack: Flip a 2 Drawer Malm Nightstand
  • DIY Indoor Climbing Wall: ORC Week 8
  • DIY Gaming Couch from Scrap Wood: Fall ORC Week 7
  • DIY Mini Fridge Cabinet: Corner Coffee and Wine Bar

makeitwithkate

Who loves a planked ceiling? 🤚 🤚🤚 This is Who loves a planked ceiling? 🤚 🤚🤚 This is a great beginner project - details below, and highlight bubble titled “ceiling”:

🌟 unfinished pine tongue and groove from @loweshomeimprovement 
🌟 Early American and Weathered Oak stain from @varathane 
🌟  @ryobitoolsusa  sander, nail gun and miter saw 
🌟 moulding from @homedepot 
🌟 inspiration from @angelarosehome 

Steps:

1️⃣Sand and stain all of the boards, I like to layer the stains with early American first then weathered oak

2️⃣ cut boards to width

3️⃣ place them in the opposite direction of the ceiling joists with the nailer, nailing into studs as you go

4️⃣ attach moulding and caulk the seams

#diy #plankedceiling #moderntraditional #diyhomedecor #diyhomeprojects #girlswithpowertools #homedesign #halfbath #halfbathmakeover #walltreatment
Arched built-ins are done!! 🤍🤍 I love this s Arched built-ins are done!! 🤍🤍 I love this simple transformation and think it really updates this living room a bit. ➡️swipe all the way through to see the before! #diy #diybuilds #girlswithpowertools #homedesign #homedecor #livingroomdesign #moderntraditional #shediys
Back to renovating this space piece by piece, good Back to renovating this space piece by piece, goodbye carpet and hello hardwoods! Next up, updating the built ins a bit :) ⏩ swipe to see the before 😳 #diyblogger #homedecor #moderntraditional #homerenovation #bhg #houseflip #homeupdate @flooranddecor
⭐🌲⭐It's now week 82 of the #RefinishedFurni ⭐🌲⭐It's now week 82 of the #RefinishedFurnitureTour !⁣⁣⁣⁣
⁣
We hope you will join us to connect with new artists and get inspired to refinish and style your furniture in unique ways!⁣⁣⁣⁣
⁣
Here’s how to join!⁣⁣⁣⁣
⁣
🎨 1. Follow Our Hosts:⁣⁣⁣⁣
⁣
@lubblyjubblyfurniture⁣⁣⁣⁣
@click2restore⁣⁣⁣⁣
@bluewreninteriors
@khicktiques_ 
@redeemedwoodcreations 
⁣
And Guest hosts

@lively.by.lu
@needleandbrushdecor
@ourlovelylittlefarm
@purposely_refurbished
@renata.tully
@the_shabby_pearl
@upbycris
@vintage_mimosa_fl

🎨 2. Follow the hashtag #RefinishedFurnitureTour⁣⁣⁣⁣
⁣
🎨 3. Follow the accounts under the hashtag you find inspiring!⁣⁣⁣⁣
⁣
🎨 4. DM a permanent host to join the tour and start connecting with new friends!⁣⁣⁣⁣
⁣
The #RefinishedFurnitureTour will run every Monday at 12 noon EST through Wednesday at 12 noon EST.⁣⁣⁣⁣
⁣
In addition, we will be hosting giveaways once a month for tour members! 🎉⁣⁣⁣

#refinishedfurnituretour82
Who loves a good #ikeaflip ?! 🤚 Better yet, who Who loves a good #ikeaflip ?! 🤚 Better yet, who loves a FB Marketplace/IKEA flip??!! 🤚🤚🤚 #ad Would you take a look at how this @myoverlays Gracie kit COMPLETELY transformed this piece! It looks so custom! ➡️➡️ swipe to see the before and tell me if you would think it’s the same piece!
.
.
@myoverlays are decorative overlay panels that can be glued to drawer fronts and painted, it seriously couldn’t be easier. PLUS, they are made to fit different styles of IKEA furniture and there are so many different overlays to choose from.

🌟 use the coupon code MAKEITWITHKATE15 to get 15% off your O’verlays purchase!
.
.
#furnitureflip #ikeahack #ikeamalm #ikeanightstand #diy #buildit #moderntraditional #girlswhobuild #restoredfurniture #fbmarketplace #marketplaceflip
🌟 WEEK 8 🌟 The game room is DONE!! This #one 🌟 WEEK 8 🌟 The game room is DONE!! This #oneroomchallenge was so much fun to participate in. I got quite a bit done in this room! Here’s a recap: .
.
1️⃣ mock up and design 
2️⃣ faux brick wall 
3️⃣ built in gaming console 
4️⃣ faux marble countertop
5️⃣ picture frame shelves 
6️⃣ diy neon sign 
7️⃣ diy gaming couch
8️⃣ build a rock wall

And that’s a wrap!! You can find tutorials for all of these components on my blog (link in bio) and video walkthroughs in the highlight bubbles @betterhomesandgardens @oneroomchallenge 
.
What’s your favorite part?? 
#bhgorc #oneroomchallenge #diybuilds #gameroom #playroom #girlswithpowertools #buildlikeagirl #diybabegang #diyprojects #girlswhodiy #interiordesign #moderncolonial
🌟 WEEK 7 🌟 I built a couch!!! Out of SCRAP W 🌟 WEEK 7 🌟 I built a couch!!! Out of SCRAP WOOD. Fun fact- the back of this couch, swipe to see, is made out of wood that made up built-ins in this room that I ripped out as part of my very first DIY project. That is some awesome repurposing! 
.
.
The tutorial I used is from @homemade_modern 
.
. 
Next week is the end of this challenge, it’s been so fun! #oneroomchallenge #repurposed #diybuilds #girlswithpowertools #bhgorc #ryobitools #diyfurniture #girlswhobuild @oneroomchallenge @betterhomesandgardens
🌟 WEEK 6 🌟 I made a neon light sign!! Learni 🌟 WEEK 6 🌟 I made a neon light sign!! Learning new things is one of my favorite parts of DIY. This was a roller coaster of emotions but I’m so thrilled with how it came out!! This challenge is almost over, but I have a few more tricks up my sleeve. (Also this week, the backlit moulding!) #bhgorc #oneroomchallenge @betterhomesandgardens @oneroomchallenge #diyneonsign #ledsign #diyled #diyblogger
🌟 WEEK 5 🌟 I can’t believe we are in the f 🌟 WEEK 5 🌟 I can’t believe we are in the final stretch of the #oneroomchallenge - if I’m being honest, I’m loving the slower pace of taking this room bit by bit instead of doing it as quickly as I can. Have you enjoyed following the slower pace or are you ready for me to move on to the next space already? ▶️ this week, I’ll be making a neon LED sign 🤞- I’m excited for this!! #bhgorc @betterhomesandgardens @oneroomchallenge #gameroommakeover #kidsplayroom #builtins #brickwall #fauxmarble #paintedleather
I like to DIY, and I also love to have fun :) Foll I like to DIY, and I also love to have fun :) Follow my journey as I discover a love of power tools, and turning my builder grade colonial into a home. The real fun is in stories ;) see ya there! #diy #girlswithpowertools #diyblogger #buildlikeagirl
Psst…if you missed it in stories, these leather Psst…if you missed it in stories, these leather chairs are PAINTED! My mind has been truly blown by this. I wish you could feel them through the screen, you would never know! I used the @heirloomtraditionspaint all-in-one paint and they look updated and perfect. #oneroomchallenge @oneroomchallenge @betterhomesandgardens #bhgorc #furnitureflip #leatherchairs #diyblogger
See that sideboard over there? ▶️ swipe to see See that sideboard over there? ▶️ swipe to see what it looked like before! #furnitureflip #diyprojects #furnituremakeover
Load More... Follow on Instagram
Copyright © 2022 · Make it with Kate · Hearten Made ⟡