• Skip to primary navigation
  • Skip to main content
  • Skip to primary sidebar
  • Skip to footer
  • Home
  • About
  • Work with Me

Make it with Kate

  • Home
  • DIY Woodworking
    • Building Projects
      • DIY Mudroom Build
      • DIY Corner Coffee Bar Build: Wine Storage, Floating Shelves, Cabinets and more!
      • DIY Living Room Projects: Built-ins, Wall Treatment, Beams, and More!
      • Staircase Makeover: Carpet to Wood Stairs
      • Fall One Room Challenge 2021: Game Room Makeover
  • DIY Home Decor
    • Furniture Flips
    • Dollar Tree Crafts
    • Small Wooden DIYs
      • 3 DIY Farmhouse Trays to Make
    • Wall Decor
  • Fall One Room Challenge
  • Seasonal
  • Holiday
  • Instagram

DIY Built-in Shelving

January 7, 2021DIY Woodworking

I love the look of a custom built-in. What really separates a free standing bookshelf from a custom bookshelf to me is the trim work and moulding that is added. We have done a few DIY home projects and this is one of my favorite to date.

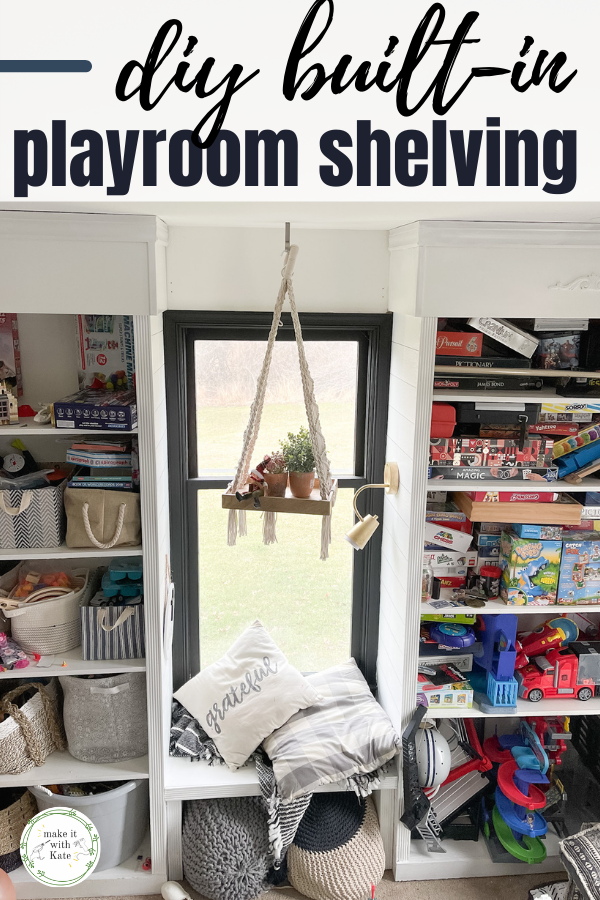
This DIY built in shelving project was one that we added in our playroom to maximize storage space for toys and board games. Check out the straightforward process!

This DIY built in shelving follows a very basic technique for beginner woodworkers to create functional storage.#diywoodworking #diybuiltins #playroomstorage #beginnerwoodworking #buildityou

DIY Built in Shelving for a Playroom

When we purchased this house, the room off of the living room had media shelving along one wall.

This is the room that we use for our playroom, and with the shelving being only about 9 inches deep, baskets and board games hung over. I wanted this space to really fit everything and also be fully accessible for the kids – so we built exactly what we needed!

When researching this project I had initially decided upon doing an Ikea hack built in where you place the Ikea bookshelves along the wall and trim them up. This sounded like the easiest option, but after further consideration I wanted extra deep shelves that Ikea bookcases didn’t allow.

In making a custom build, I was able to measure our deepest board game and our tallest toy, and build shelves that would exactly fit those items. This made me SO happy 🙂

This DIY built in shelving follows a very basic technique for beginner woodworkers to create functional storage.#diywoodworking #diybuiltins #playroomstorage #beginnerwoodworking #buildityou

Planning the DIY Built in Shelving

When planning the space that you want to fit the shelving into, take basic measurements such as width, height and depth. Then, start sketching!

Putting a pencil to paper is still my favorite way to plan a project like this. I wanted the shelves in certain spots to fit exactly what we needed, so my bottom shelves have more space between them than my top shelves.

For us, the bottom shelves have baskets of toys and large toy towers, and the top shelves contain stacks of board games.

When planning, consider the style of trim that you like, including baseboard and crown moulding for the top of your built in shelving. Trust me, these will be what really make these look spectacular.

What you need to make the built in shelving

  • MDF boards (Home Depot will rip these to the lengths that you need)
  • Nail gun
  • Miter Saw
  • Table or Circular Saw
  • Moulding
  • edge tape
  • Caulk
  • Plastic wood
  • Paint

Framing the built-in shelving

For this project, we kept the back wall open so anchored the side walls of the bookcase to the back wall with brackets.

This DIY Built in Shelving is a great project for beginners who want a budget friendly way to add custom built in storage for their space. #built ins #diy built ins #built in shelving #diy wood projects #diy home projects

In order to frame the bottom of the bookcase, float the bottom shelf up a few inches so that you can add baseboard in the front of the bottom shelf, making it look custom.

We chose to encase the top of the shelving with a box, so didn’t place a top on the unit, instead went all the way up to the ceiling with the side walls.

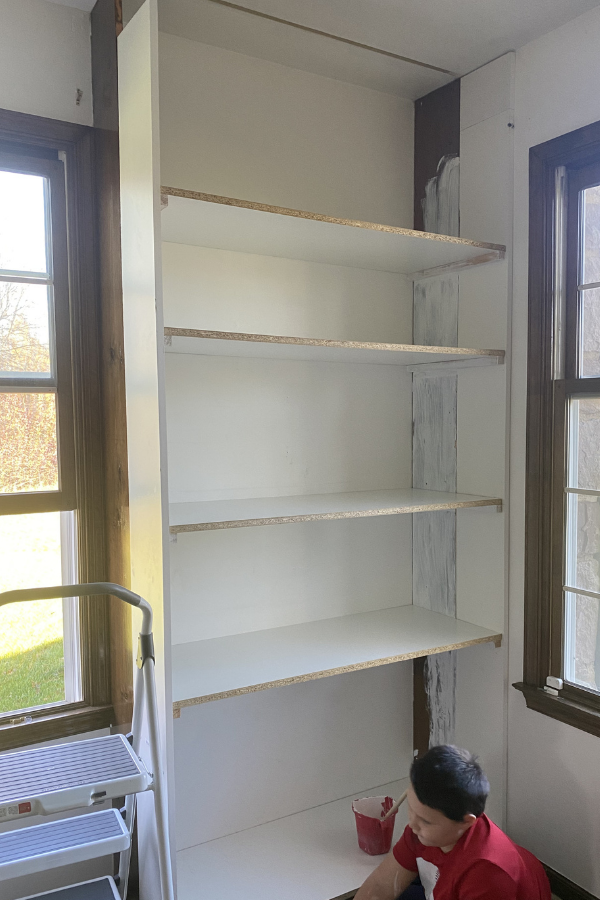
Add the shelving to the built ins

Rather than adding pocket holes and floating the shelving, we went with an easier option by placing 1″x1″ square dowel rods as brackets for each shelf.

Cut the dowels to the depth of the unit with the miter saw. Cut two per shelf you are adding.

This DIY Built in Shelving is a great project for beginners who want a budget friendly way to add custom built in storage for their space. #built ins #diy built ins #built in shelving #diy wood projects #diy home projects

Measure the height of each shelf, and using your level and nail gun, attach a dowel to the inside of each wall board where the shelf will be placed.

Cut the MDF plank to the width that you need for each shelf, then place the shelf on the dowel brackets.

Continue adding dowel brackets and shelves.

To make a box like we did on our shelving, place a board across the top of the unit, and then a board on each side of the unit. Ue the nail gun to secure all of this into place.

This DIY Built in Shelving is a great project for beginners who want a budget friendly way to add custom built in storage for their space. #built ins #diy built ins #built in shelving #diy wood projects #diy home projects

You should now have a basic bookcase frame with shelving and a box around the top!

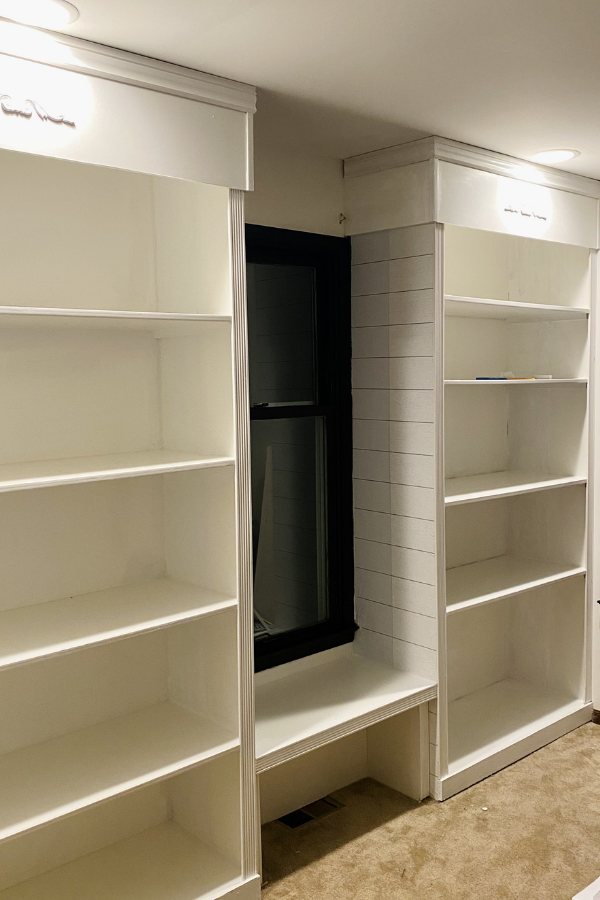
Add the finishing touches

This is where the moulding and the trim work comes in and really makes the project pop.

Add baseboard to the bottom of the cabinet, wrapping around the sides but cutting the edges with a miter saw at a 45 degree angle.

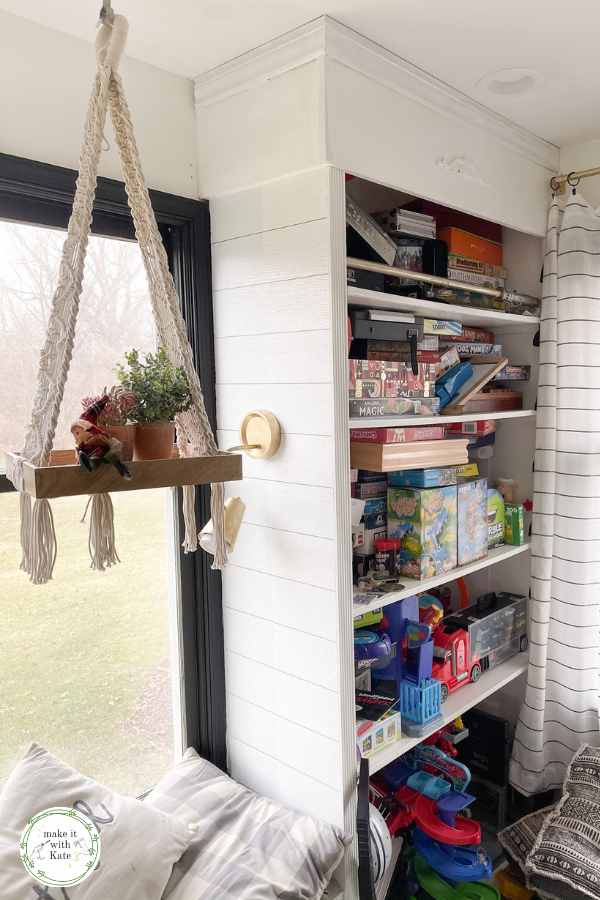
Add moulding to the sides of the bookcase, we chose a thick reed moulding that has a nice look to it.

Add crown moulding around the top of the built in wrapping around the sides as well.

This DIY Built in Shelving is a great project for beginners who want a budget friendly way to add custom built in storage for their space. #built ins #diy built ins #built in shelving #diy wood projects #diy home projects

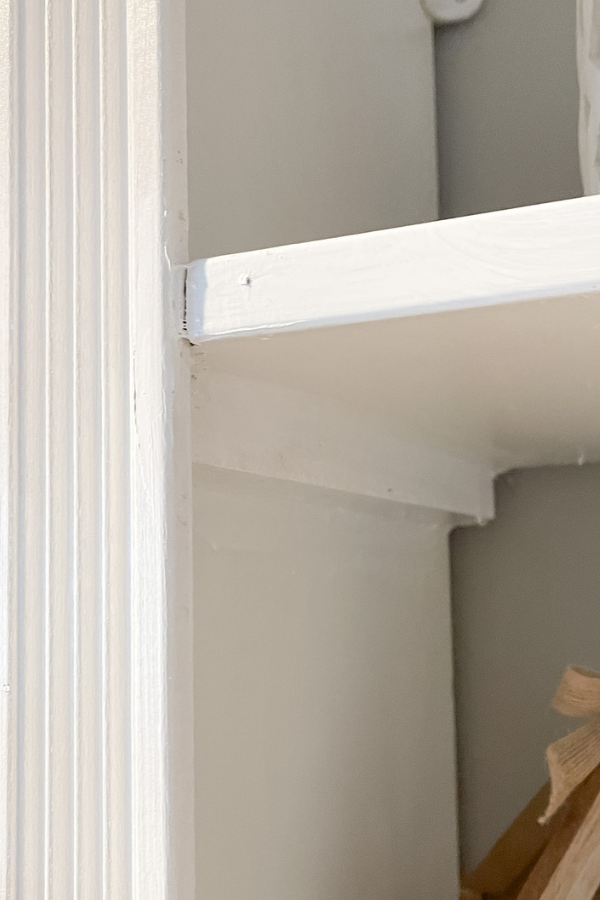
Use edge tape on any exposed shelving fronts by ironing on to the wood according to the directions, this is such a great hack that allows you to use particle board for this project.

Once all of the wood is nailed on, use caulk on any seams where the wood meets the wall, and use plastic wood filler to fill in any nail holes or patch up seams where moulding meets each other.

I added some peel and stick shiplap wallpaper to the exterior walls of this project to give it a little extra pizzaz.

This DIY Built in Shelving is a great project for beginners who want a budget friendly way to add custom built in storage for their space. #built ins #diy built ins #built in shelving #diy wood projects #diy home projects

Ta-Da! Your built ins should be complete!

This DIY built in shelving follows a very basic technique for beginner woodworkers to create functional storage.#diywoodworking #diybuiltins #playroomstorage #beginnerwoodworking #buildityou

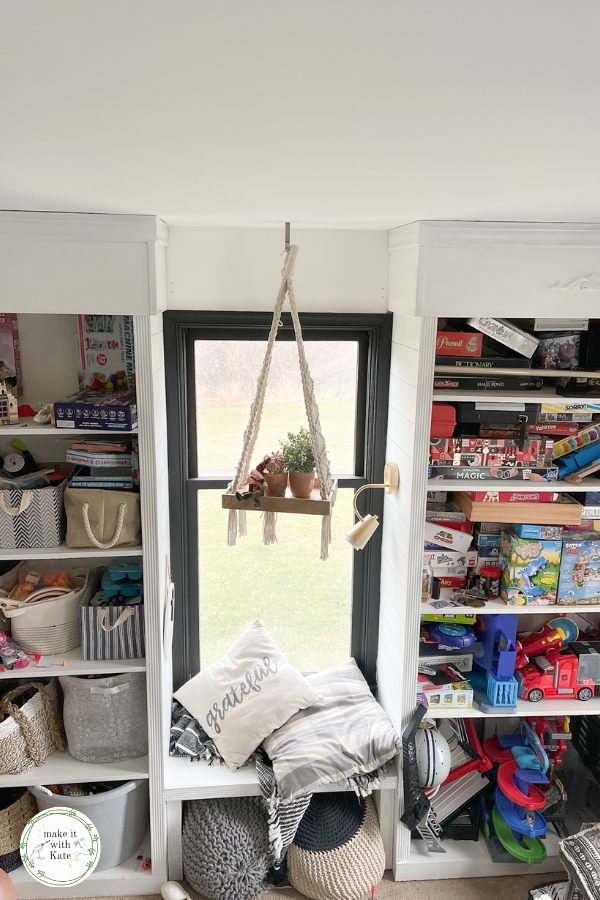
We opted to add a little window seat in between the two built ins, my kids love this space to read!

This DIY built in shelving follows a very basic technique for beginner woodworkers to create functional storage.#diywoodworking #diybuiltins #playroomstorage #beginnerwoodworking #buildityou

Psst, check out that DIY Wall Sconce for under $10!

Have any questions about making your DIY built in shelving?

I wish I had taken more detailed process photos of the step by step of this project, but I wanted to give you a general idea of how to build these!

If you have any questions at all, leave me a comment here or DM me on Instagram and I’ll answer to the best of my ability!

Like this? Check out the DIY Built-ins from stock cabinets that we did in our living room around the fireplace too!

Related Posts:

  • DIY Living Room Projects: Built-ins, Wall Treatment, Beams, and More!
    DIY Living Room Projects: Built-ins, Wall Treatment, Beams,…
Previous Post: « DIY Built-ins with Stock Cabinets
Next Post: Round DIY Farmhouse Tray »

Reader Interactions

Comments

  1. FAGGS6

    January 8, 2021 at 5:03 pm

    Thank you!!1

    Reply

Trackbacks

  1. DIY Built-ins with Stock Cabinets says:
    January 8, 2021 at 8:24 pm

    […] not even close to professional (or even intermediate) builders. After figuring out how to create built-in shelving in our playroom and adding some basic closet shelving, we felt confident enough to tackle the DIY built-ins from […]

    Reply
  2. DIY Wall Sconce from a Table Lamp - Make it with Kate says:
    January 10, 2021 at 5:29 am

    […] how to make the DIY built-in shelving that this lamp is attached […]

    Reply
  3. DIY Closet Shelves: Hall Closet Organization on a Budget - Make it with Kate says:
    January 13, 2021 at 4:11 am

    […] DIY Built-in Shelving […]

    Reply
  4. The 38 Timeless Window Decor Ideas (Classic) says:
    November 28, 2022 at 10:37 pm

    […] Source: makeitwithkate.com […]

    Reply

Leave a Reply Cancel reply

Your email address will not be published. Required fields are marked *

Primary Sidebar

Search for what you need

Welcome!

Find inspiration for DIY home projects and crafts on a budget! You can usually find me with either a hot glue gun or a can of spray paint in hand 🙂

Get social:

  • Instagram

Recent Posts

  • Double Picture Frame Moulding DIY
  • 7 Easy DIY Fall Centerpieces
  • Fall House Decoration to Add Warmth
  • DIY Stair Runner with Corner Turn
  • DIY Stair Risers on a Budget

makeitwithkate

🪚 Transforming builder grade into modern colonial
🔨 DIY builds and decor
🪑 Furniture flips

Make it with Kate | DIY Blog
These motorized roller shades from @smartwingshome These motorized roller shades from @smartwingshome are the final missing piece to this living room makeover! I just love how easy they are to use with the remote or as part of my home automation. The color is the perfect neutral and the linen provides great light-filtering. These are the SmartWings Motorized Light Filtering Roller Shades 70% Blackout Linen, color Caramel.
🌟🌟 L I V I N G  R O O M  R E V E A L 🌟🌟 what’s new? Wall treatment, door and window trim, stained beams, updated doors, lighting and paint! DIY is too much fun 🥰 do you have a favorite part? ➡️➡️ swipe to see some progress/before pics! #diyhome #livingroomdecor #moderntraditional #diydecor
🌟The living room I bought versus the one I crea 🌟The living room I bought versus the one I created. 🌟 The number one thing I’ve learned in DIY, is to follow and know the trends, but ultimately find your own style and create what you love, and what you are your family are comfortable in. #diy #diyhome #livingroom #moderntraditional
Here are 5 tips for styling your shelves! 👇

1️⃣ Balance: vary shapes, sizes, and height to create visual interest

2️⃣ Color Coordination: You can group similar colors together or use gradients of a color palette. An easy way to do this is to stick with either warm or cool tones.

3️⃣ Layering: Place larger items at the back and smaller items in front to create depth and visual intrigue, or small items on top of large. 

4️⃣ Negative Space: Leave some empty space to allow the eye to rest and to highlight the items you’ve chosen to display.

5️⃣ Personal Touches: Incorporate items personal to you such as photos, artwork, or keepsakes to make the shelves feel more personal and reflective of your style and interests.
I’m loving how fresh this living room feels now! I’m loving how fresh this living room feels now! #diyhome #moderntraditional #livingroom #diydesign
These doors are DONE! This was a labor of love but These doors are DONE! This was a labor of love but I am happy with how they turned out! The reeded film over the plexiglass keeps the playroom mess out of sight, but the room feels a bit more open this way. More details in highlights! #diyhome I used @retiqueliquidwood to cover the chalk paint without any sanding!
Taking these doors from painted and scratched to w Taking these doors from painted and scratched to wood-grained French doors with @retiqueliquidwood - they are almost done, stay tuned for the end result! I think they will be good! #diydoors
I’m making progress in this living room! Next st I’m making progress in this living room! Next step is to take these beat up, painted doors and make them look like new French doors! I cut large holes in the middle of them and am going to make a plexiglass insert. Here’s hoping!
Let’s take these beams from painted black to a b Let’s take these beams from painted black to a barn wood look. Check out this fun and easy process! What do you think?!
Picture frame moulding in the living room phase 1! Picture frame moulding in the living room phase 1! I updated the door and window trim to a craftsman style, the added double box moulding to the walls, and board and batten to the breakfast bar. Stay tuned to watch this get finished! It’s gonna be good!
I’m switching out the trim work in my living roo I’m switching out the trim work in my living room to add Craftsman moulding to the doorway and window! This is part of a living room refresh, stay tuned for box moulding and updated doors and beams next! #craftsmantrim #craftsmanmoulding #doortrim #diy #doityourself
Sometimes, you just have to go for it. 🔨 🪚🪛
Load More... Follow on Instagram
Copyright © 2025 · Make it with Kate · Hearten Made ⟡
Cleantalk Pixel