• Skip to primary navigation
  • Skip to main content
  • Skip to primary sidebar
  • Skip to footer
  • Home
  • About
  • Work with Me

Make it with Kate

  • Home
  • DIY Woodworking
    • Building Projects
      • DIY Mudroom Build
      • DIY Corner Coffee Bar Build: Wine Storage, Floating Shelves, Cabinets and more!
      • DIY Living Room Projects: Built-ins, Wall Treatment, Beams, and More!
      • Staircase Makeover: Carpet to Wood Stairs
      • Fall One Room Challenge 2021: Game Room Makeover
  • DIY Home Decor
    • Furniture Flips
    • Dollar Tree Crafts
    • Small Wooden DIYs
      • 3 DIY Farmhouse Trays to Make
    • Wall Decor
  • Fall One Room Challenge
  • Seasonal
  • Holiday
  • Instagram

DIY Mudroom: Final Reveal, Styling and FAQ’s

January 27, 2021Building Projects, DIY Woodworking

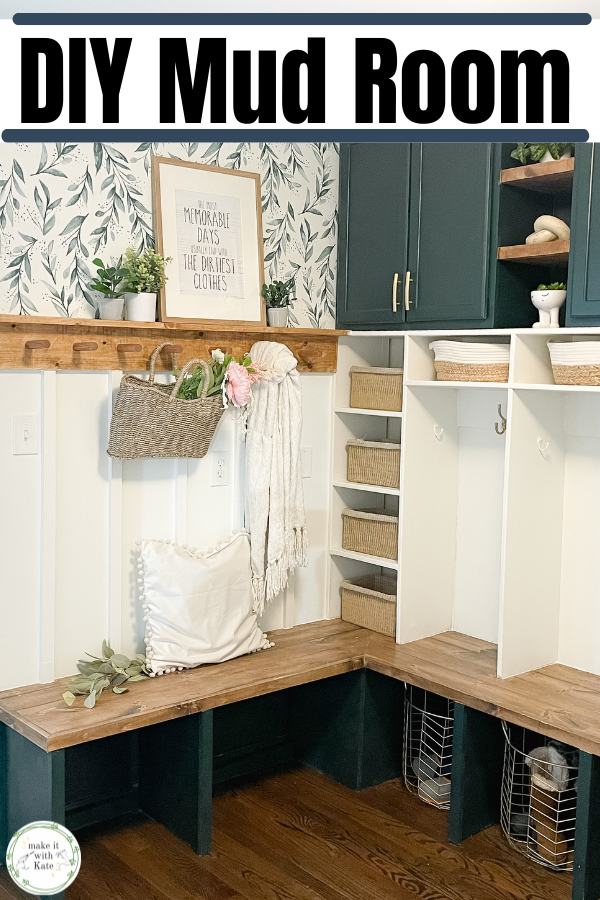
This was such a labor of love, and I’m so happy with how the entire project turned out! Creating my own DIY mudroom allowed me to really bring my design to life, and customize all of the nooks and crannies to fit our lifestyle.

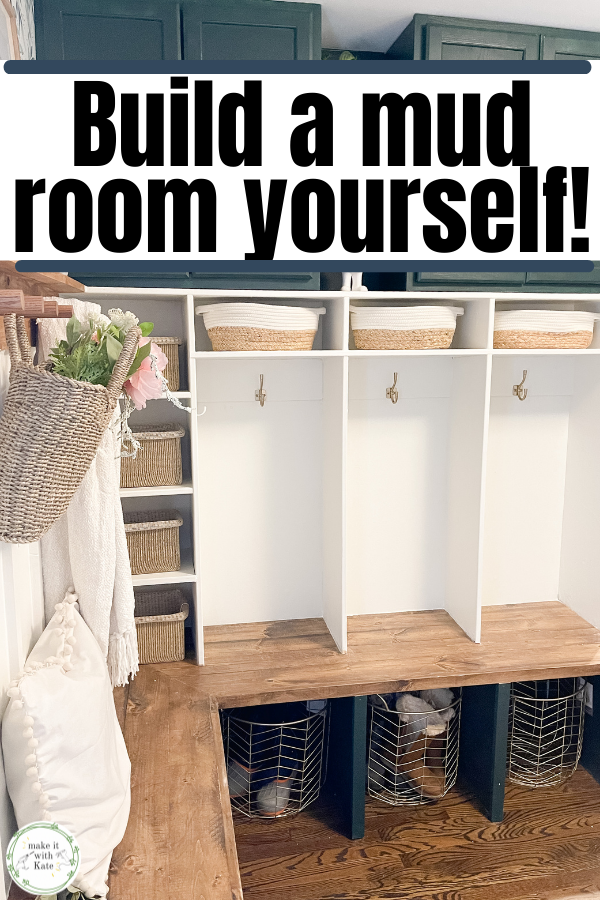
This is a recap posts of all of the pieces that brought this mudroom together. Included are a corner bench, cabinets, a locker unit, and a peg rail board and batten wall with wallpaper.

This DIY mudroom has a beautiful corner bench, lockers, cabinets, and a peg rail batten wall. See all of the tutorials and FAQs. #diymudroom #mudroombuild #mudroomstyling #homedecor

Building the DIY Mudroom

Below are the links to all of the various components to this mudroom build. If you haven’t seen them yet, check them out first to see how everything is built, then come back here for FAQ’s and styling info.

  • DIY Mud Room Part 1: DIY Mudroom Bench
  • DIY Mud Room Part 2: Adding Mudroom Locker Cabinets
  • DIY Mud Room Part 3: DIY Mudroom Lockers
  • Mud Room Part 4: DIY Board and Batten with Peg Rail Top
This DIY mudroom has a beautiful corner bench, lockers, cabinets, and a peg rail batten wall. See all of the tutorials and FAQs. #diymudroom #mudroombuild #mudroomstyling #homedecor

FAQ’s about the Mud Room

While building this mud room, I documented the entire process about how I built everything in my Instastories. You can follow me on Instagram and find all of those videos saved in my Highlights – titled Mud Room (there are a few of them for each component).

While sharing that process, I got quite a few questions and want to share some of them here. I’ll update this if more come in – if you have a question to add, send me a message on IG or leave a comment on this post!

This DIY mudroom has a beautiful corner bench, lockers, cabinets, and a peg rail batten wall. See all of the tutorials and FAQs. #diymudroom #mudroombuild #mudroomstyling #homedecor

What paint color did you use?

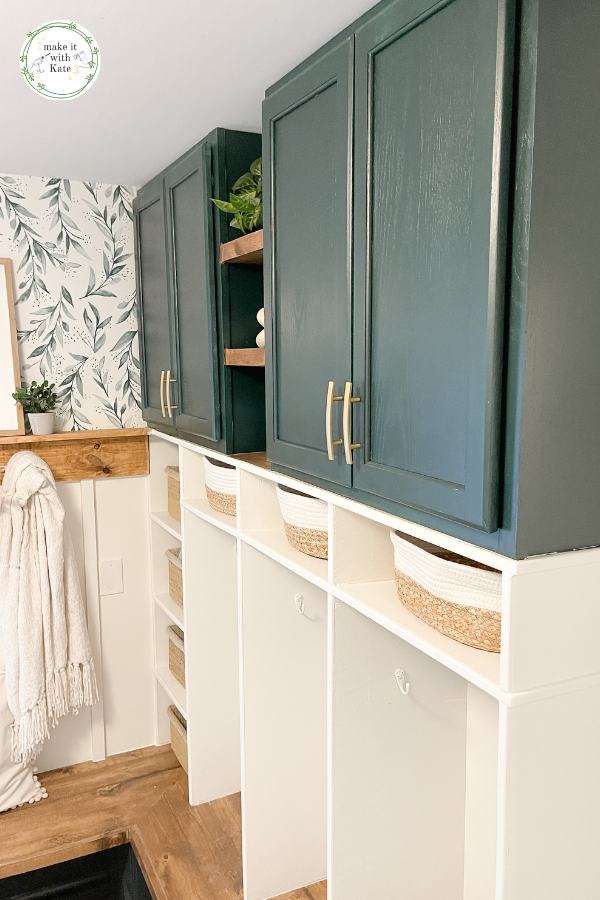
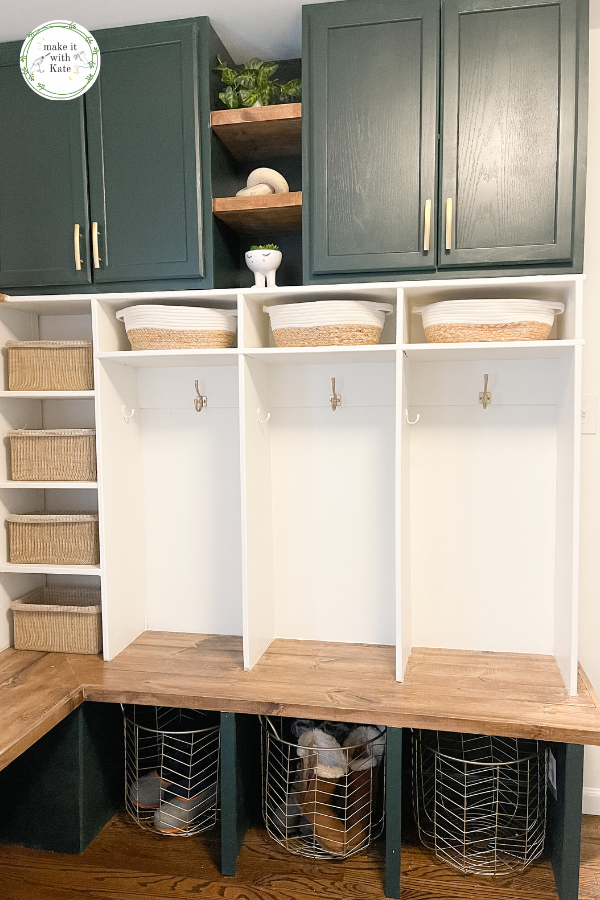
The color of these cabinets and the bench cubbies is Salamander by Benjamin Moore.

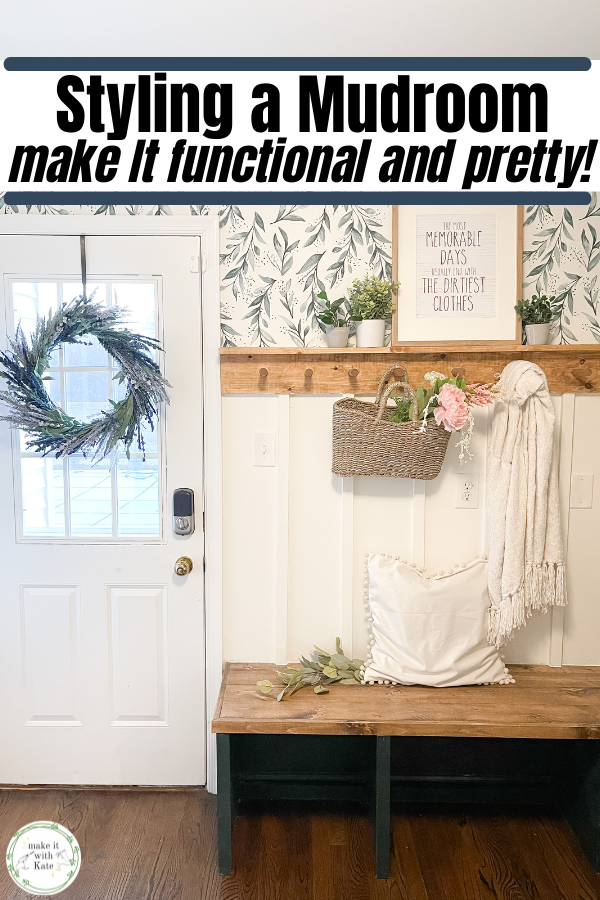
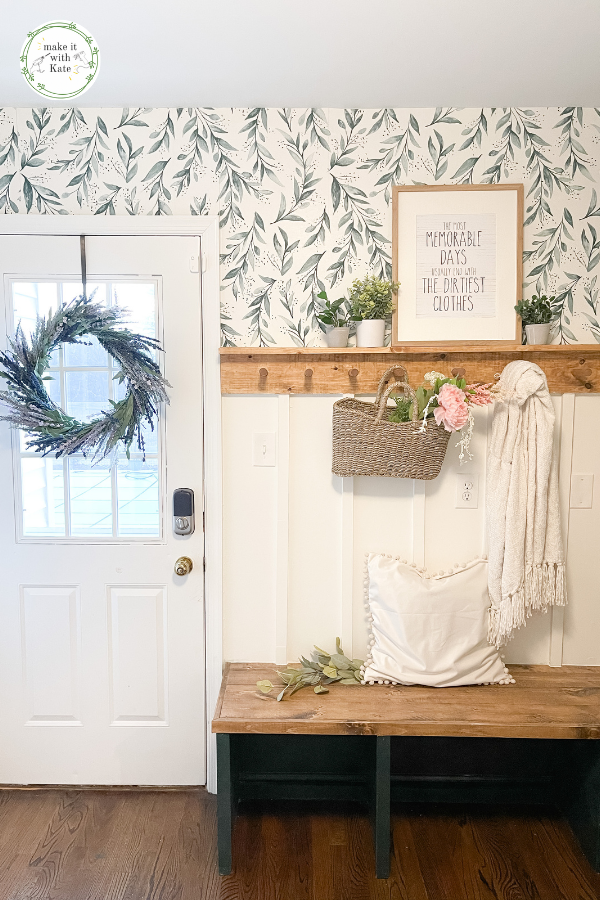
The white used on the batten wall and the lockers is White Dove by Benjamin Moore.

I used Stix primer on the cabinets and the plywood.

The stain used on the bench top and the peg rail is Varathane Early American.

This DIY mudroom has a beautiful corner bench, lockers, cabinets, and a peg rail batten wall. See all of the tutorials and FAQs. #diymudroom #mudroombuild #mudroomstyling #homedecor

Where is the wallpaper from?

This wallpaper is SO pretty! And it’s peel and stick which is super easy to apply (and remove).

This one is from Target, the Roommates Olive Branch Magnolia Home Wallpaper in Green.

This DIY mudroom has a beautiful corner bench, lockers, cabinets, and a peg rail batten wall. See all of the tutorials and FAQs. #diymudroom #mudroombuild #mudroomstyling #homedecor

Where are the stock cabinets from?

These stock cabinets are from Lowe’s. I have purchased them from Home Depot as well for other projects such as my DIY Built-ins with Stock Cabinets.

Here are more tips about using stock cabinets for built ins.

What tools did you use?

My favorite brand of tools to use is Ryobi. I have the cordless kit with rechargable batteries. Having everything be the same system where I can easily pop a battery out and into another tool is so helpful!

What kind of wood did you use?

The bench is made of 3/4″ sanded plywood for the cubbies, and common board for the bench top.

The lockers are made of 3/4″ plywood and wood trim.

The cabinets were purchased stock cabinets.

The peg rail and batten is made of common board and wooden dowels.

How much did the project cost?

  • Lumber (plywood, common board, trim): $220
  • Paint, primer and stain: $80
  • Cabinets: $140
  • Hardware: $30
  • Wallpaper: $50

Total cost = roughly $520

I did already have some scrap wood for things like the floating shelves, and I also had screws and all of the tools needed.

(I did have a quote for much less of a build and not as much storage space for almost $4,000 – so this was a huge cost savings for me!)

What are the measurements?

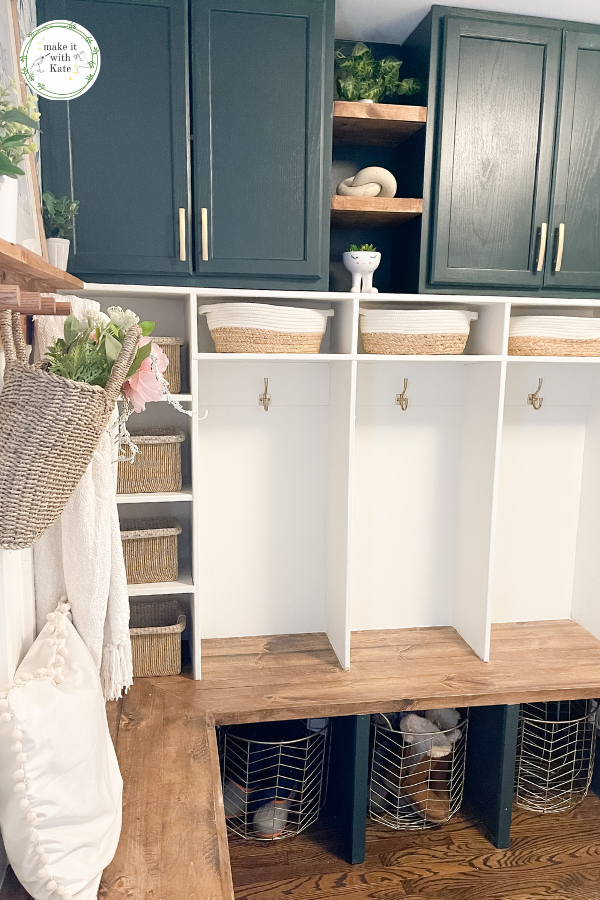
The locker wall is 69″ long, with the cabinets being 30″ wide each.

Each locker unit is 18″ wide, and the shelving unit is 15″ wide.

The bench is 20″ tall and the cubbies are 18″ wide.

The batten wall and peg board is 46″ wide.

This DIY mudroom has a beautiful corner bench, lockers, cabinets, and a peg rail batten wall. See all of the tutorials and FAQs. #diymudroom #mudroombuild #mudroomstyling #homedecor

Styling the Mud Room

Once the entire mud room unit was built, the really fun part came in the styling!

Everything seen here is purchased primarily from either Home Goods or Target.

All of the baskets seen here including the wicker baskets and the large wire shoe baskets are from Home Goods, as is the wreath hanging on the door.

The hooks inside the lockers are from Home Depot.

The hanging basket, faux plants, and shelf decor are all from Target.

Is any of this styling functional? No. But, it sure makes the room look cute.

This DIY mudroom has a beautiful corner bench, lockers, cabinets, and a peg rail batten wall. See all of the tutorials and FAQs. #diymudroom #mudroombuild #mudroomstyling #homedecor

Building floating shelves between the cabinets

One aspect of the mud room that I didn’t touch on at all in any of the tutorial posts are the floating shelves in between the cabinets.

The space between the cabinets was painted green on the wall, but that area didn’t look finished without the shelving.

I made the floating shelves by taking two 1″ square dowels on each end, nailing a piece of 1/4″ plywood to the top and bottom of the dowels so that the shelf was a hollow cube.

I then placed them between the cabinets, and nailed through the inside of the cabinets into the dowels on the ends of the shelves.

Then, I added a 1×2″ piece along the front from cabinet to cabinet. I stained these to match the top of the bench and the peg rail with the Varathane Early American as well.

This DIY mudroom has a beautiful corner bench, lockers, cabinets, and a peg rail batten wall. See all of the tutorials and FAQs. #diymudroom #mudroombuild #mudroomstyling #homedecor

Related Building Projects

  • DIY Built-in Shelving
  • DIY Built-ins with Stock Cabinets
Previous Post: « Mud Room Part 4: DIY Board and Batten with Peg Rail Top
Next Post: Stock Cabinets for Built ins: What they are and where to get them »

Reader Interactions

Comments

  1. Lindsay

    January 22, 2023 at 9:16 pm

    Looks beautiful! How deep is the bench the doesn’t have the lockers above it?

    Reply

Trackbacks

  1. How to remove carpet from stairs - Make it with Kate says:
    February 7, 2023 at 5:21 pm

    […] exactly what my plan was going to be, but I knew that I wanted the carpet gone and that I wanted a DIY wooden looking finish at the end. So, how to remove carpet from stairs…it’s easier than […]

    Reply

Leave a Reply Cancel reply

Your email address will not be published. Required fields are marked *

Primary Sidebar

Search for what you need

Welcome!

Find inspiration for DIY home projects and crafts on a budget! You can usually find me with either a hot glue gun or a can of spray paint in hand 🙂

Get social:

  • Instagram

Recent Posts

  • Double Picture Frame Moulding DIY
  • 7 Easy DIY Fall Centerpieces
  • Fall House Decoration to Add Warmth
  • DIY Stair Runner with Corner Turn
  • DIY Stair Risers on a Budget

makeitwithkate

🪚 Transforming builder grade into modern colonial
🔨 DIY builds and decor
🪑 Furniture flips

Make it with Kate | DIY Blog
These motorized roller shades from @smartwingshome These motorized roller shades from @smartwingshome are the final missing piece to this living room makeover! I just love how easy they are to use with the remote or as part of my home automation. The color is the perfect neutral and the linen provides great light-filtering. These are the SmartWings Motorized Light Filtering Roller Shades 70% Blackout Linen, color Caramel.
🌟🌟 L I V I N G  R O O M  R E V E A L 🌟🌟 what’s new? Wall treatment, door and window trim, stained beams, updated doors, lighting and paint! DIY is too much fun 🥰 do you have a favorite part? ➡️➡️ swipe to see some progress/before pics! #diyhome #livingroomdecor #moderntraditional #diydecor
🌟The living room I bought versus the one I crea 🌟The living room I bought versus the one I created. 🌟 The number one thing I’ve learned in DIY, is to follow and know the trends, but ultimately find your own style and create what you love, and what you are your family are comfortable in. #diy #diyhome #livingroom #moderntraditional
Here are 5 tips for styling your shelves! 👇

1️⃣ Balance: vary shapes, sizes, and height to create visual interest

2️⃣ Color Coordination: You can group similar colors together or use gradients of a color palette. An easy way to do this is to stick with either warm or cool tones.

3️⃣ Layering: Place larger items at the back and smaller items in front to create depth and visual intrigue, or small items on top of large. 

4️⃣ Negative Space: Leave some empty space to allow the eye to rest and to highlight the items you’ve chosen to display.

5️⃣ Personal Touches: Incorporate items personal to you such as photos, artwork, or keepsakes to make the shelves feel more personal and reflective of your style and interests.
I’m loving how fresh this living room feels now! I’m loving how fresh this living room feels now! #diyhome #moderntraditional #livingroom #diydesign
These doors are DONE! This was a labor of love but These doors are DONE! This was a labor of love but I am happy with how they turned out! The reeded film over the plexiglass keeps the playroom mess out of sight, but the room feels a bit more open this way. More details in highlights! #diyhome I used @retiqueliquidwood to cover the chalk paint without any sanding!
Taking these doors from painted and scratched to w Taking these doors from painted and scratched to wood-grained French doors with @retiqueliquidwood - they are almost done, stay tuned for the end result! I think they will be good! #diydoors
I’m making progress in this living room! Next st I’m making progress in this living room! Next step is to take these beat up, painted doors and make them look like new French doors! I cut large holes in the middle of them and am going to make a plexiglass insert. Here’s hoping!
Let’s take these beams from painted black to a b Let’s take these beams from painted black to a barn wood look. Check out this fun and easy process! What do you think?!
Picture frame moulding in the living room phase 1! Picture frame moulding in the living room phase 1! I updated the door and window trim to a craftsman style, the added double box moulding to the walls, and board and batten to the breakfast bar. Stay tuned to watch this get finished! It’s gonna be good!
I’m switching out the trim work in my living roo I’m switching out the trim work in my living room to add Craftsman moulding to the doorway and window! This is part of a living room refresh, stay tuned for box moulding and updated doors and beams next! #craftsmantrim #craftsmanmoulding #doortrim #diy #doityourself
Sometimes, you just have to go for it. 🔨 🪚🪛
Load More... Follow on Instagram
Copyright © 2025 · Make it with Kate · Hearten Made ⟡
Cleantalk Pixel