• Skip to primary navigation
  • Skip to main content
  • Skip to primary sidebar
  • Skip to footer
  • Home
  • About
  • Work with Me

Make it with Kate

  • Home
  • DIY Woodworking
    • Building Projects
      • DIY Mudroom Build
      • DIY Corner Coffee Bar Build: Wine Storage, Floating Shelves, Cabinets and more!
      • Staircase Makeover: Carpet to Wood Stairs
      • Fall One Room Challenge 2021: Game Room Makeover
  • DIY Home Decor
    • Furniture Flips
    • Dollar Tree Crafts
    • Small Wooden DIYs
      • 3 DIY Farmhouse Trays to Make
    • Wall Decor
  • Fall One Room Challenge
  • Seasonal
  • Holiday
  • Instagram

diy furniture

DIY Gaming Couch from Scrap Wood: Fall ORC Week 7

November 11, 2021DIY Home Decor, DIY Woodworking, One Room Challenge

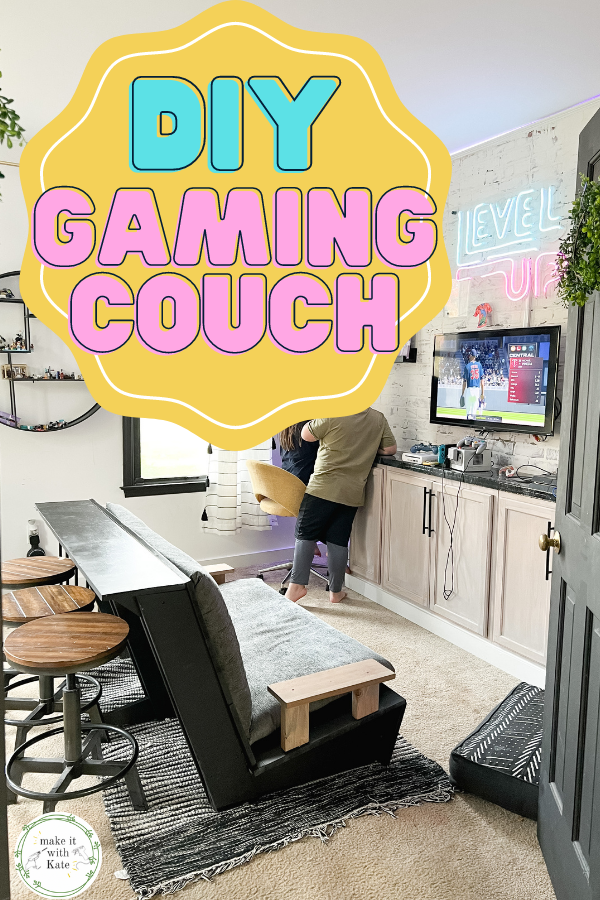
Week 7 of the fall one room challenge means the finishing touches! There is one week left until the final reveal of this game room makeover. One of the components I wanted to figure out most in this room was seating. I built this DIY gaming couch 100% from scrap wood in my garage, and it was easy!

This gaming couch is made out of scrap wood and is the perfect addition to a game room for kids, with seating for 5 in a small space

Build a DIY Gaming Couch

When we bought this house, the first thing we did was convert this media room off to the living room into a playroom.

This entailed ripping out existing built in media shelving and making my own built ins that could house board games and bins of kids toys. Luckily I saved the wood from those media shelves, because they made their way into a couch for that same space! I love a good repurposed project.

This room as a play room needed floor space that was open for play on the ground. It was filled with Magnatile towers (my very favorite kids toy) and marble runs and other works in progress all the time.

My kids have since gotten older and do less floor play, and more hanging out together playing board games and video games. So, with the transition of this room from a preschool playroom to an older gaming room, came the need for seating.

As is the case with most of my DIY woodworking projects here I like to do things on a budget, and use what I have.

How to Build the Gaming Couch

I scoured Pinterest looking for the perfect simplistic design that I could create that would not take up a lot of space and that would provide quite a bit of seating.

I landed on these plans for a Zig Zag Couch from Homemade Modern and it was perfect. It was low to the ground with a tilt up looking at the tv, perfect for gaming. BUT, it had a counter top back where 3 more bar stools can sit. This allows for 5 kids to hang out in this seating area that really doesn’t take up a lot of the room at all!

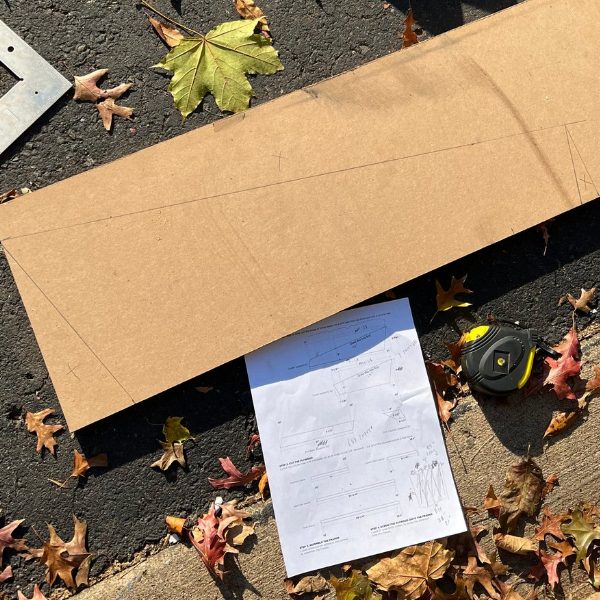
You can get the plans for the Zig Zag Couch here on their website, it has a detailed tutorial and cut list that is very easy to follow.

What scrap wood did I use?

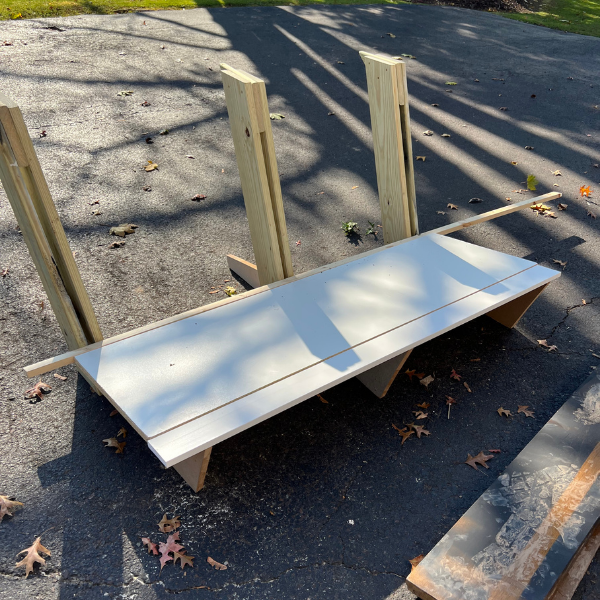
When I tell you I used scrap wood, I mean I seriously used scrap wood. If you look through the plans, they use 2x4s, 2x10s and 3/4″ plywood. When pricing this out, it would have cost me close to $200 to build, which it why I turned to the leftovers that I had!

I used:

  • 3/4″ MDF board for the bottom braces
  • 2×6 for the back braces and the countertop braces
  • 3/4″ melamine for the bench seat
  • 1×2 common board for the back of the bench to make the seat a bit longer
  • 9″ media shelves for the seat back, counter top and the bottom front

That is a serious mash up of scrap wood. But, the measurements of the wood were consistent in their thickness which is what allowed for all the variation in type.

Plus, most of these boards are quite sturdy.

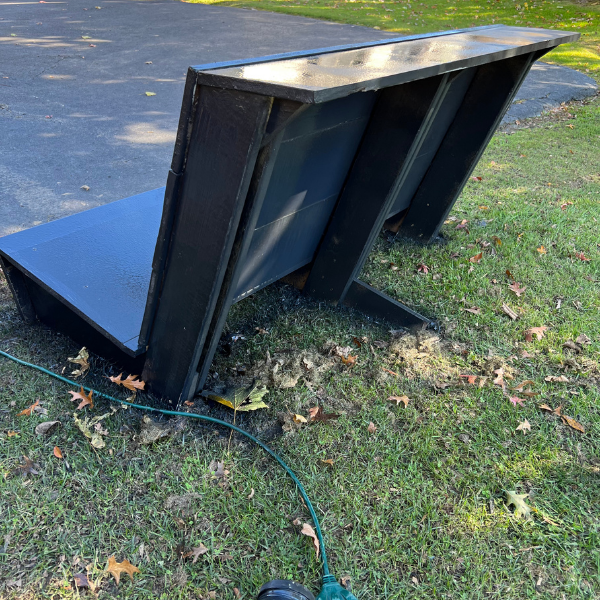
I followed the tutorial using just a circular saw to make most of the cuts, and my miter saw to make the 20° angle cuts on the back braces.

Then, I assembled the couch using 2.5″ construction screws and my drill and a brad nailer!

Finishing the DIY Couch

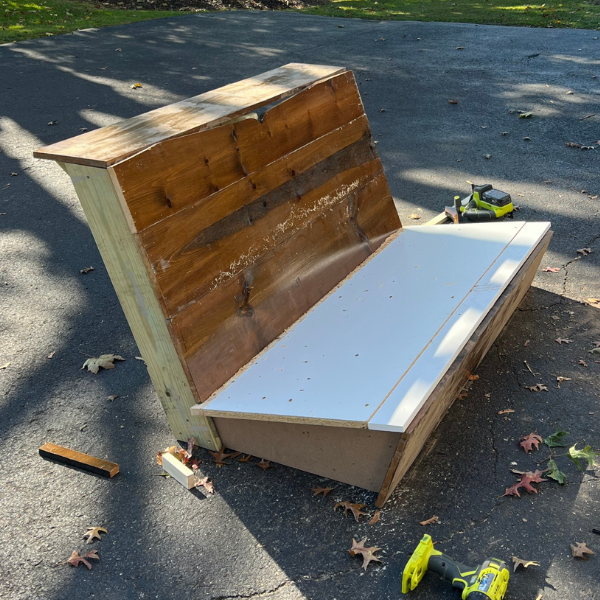
Once constructed, it was sturdy but looked rough.

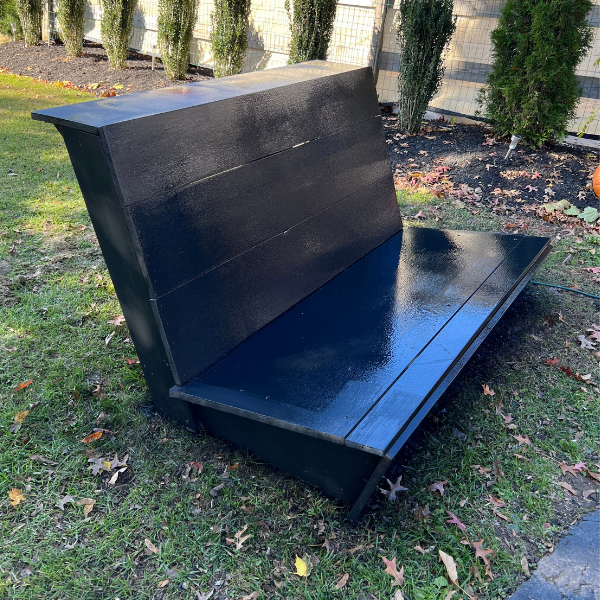
I sanded the entire unit with 40 grit sandpaper which is very rough. Even the melamine board I sanded to help it take the paint.

Then, I used Kilz primer to prime the entire piece, and used my paint sprayer to paint the entire thing black.

It now looks like a cohesive unit, and not one that was pieced together out of scraps!

Making simple couch cushions

I like to save upholstery foam from various projects that I flip, and my friend graciously gave me the foam from outdoor cushions she was replacing.

So, guess what else got made out of scraps??

I’ll show you a very simple way to make a no-sew couch cushion.

What you need:

  • 2″ or 3″ upholstery foam
  • batting
  • spray adhesive
  • 1/4″ plywood (or hardboard if placing it on solid wood like this build)
  • staple gun
  • upholstery fabric

How to make the seat base cushion

Cut the piece of plywood to fit the seat base, slightly smaller than the base of the couch.

Use spray adhesive to attach the foam to the seat base.

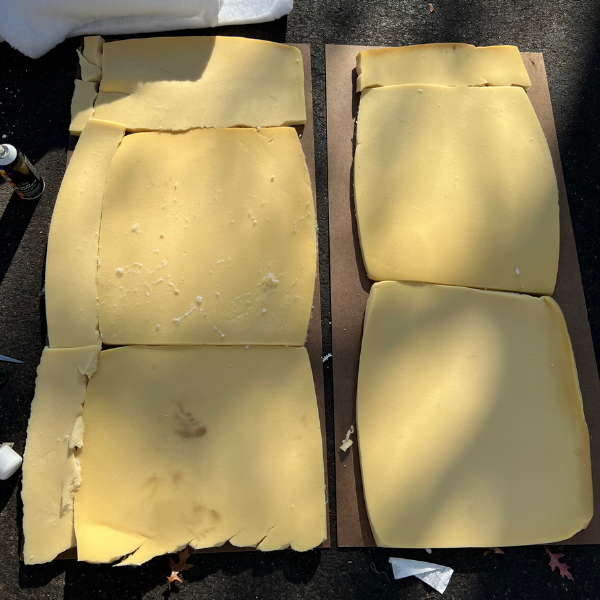
Fill in any corners or empty spaces with poly fil.

Cover the foam and poly fil with batting to smooth out the foam top.

Wrap the entire thing with upholstery fabric and flip over.

Staple the fabric and batting to the underside of the plywood (now facing up) doing the sides first.

Once the sides are attached, trim excess batting and fabric at the corners and staple to the wood.

You should have a simple bench seat cushion that you can place right on the couch base!

I used velcro to keep the cushion from sliding around the base of the couch.

I made one of these for the seat and one for the back of the couch.

This gaming couch is made out of scrap wood and is the perfect addition to a game room for kids, with seating for 5 in a small space

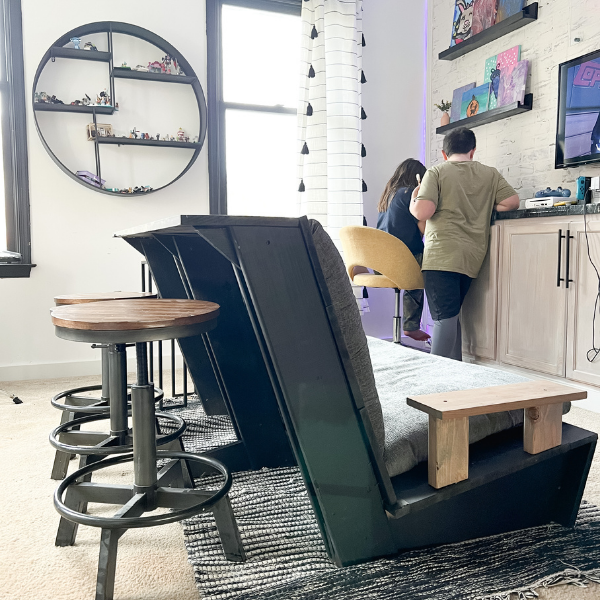
This was the perfect addition to the game room makeover!

CHECK OUT ALL OF THE POSTS IN THIS SERIES FOR PROGRESS

  • Week 1: Game Room Makeover Plans and Mood Board
  • Week 2: Make a Faux Brick Wall
  • Week 3: DIY Built in Gaming Console from Stock Cabinets
  • Week 4: DIY Faux Marble Countertop with Epoxy
  • Week 5: DIY Picture Frame Shelves
  • Week 6: DIY Neon LED Light Sign 
  • Week 7: DIY Couch with Stool Seating (current post)
  • Week 8: DIY Indoor Climbing Wall
  • Final Game Room Reveal

Primary Sidebar

Search for what you need

Welcome!

Find inspiration for DIY home projects and crafts on a budget! You can usually find me with either a hot glue gun or a can of spray paint in hand 🙂

Get social:

  • Instagram

Recent Posts

  • 7 Easy DIY Fall Centerpieces
  • Fall House Decoration to Add Warmth
  • DIY Stair Runner with Corner Turn
  • DIY Stair Risers on a Budget
  • Painting and Staining Pine Stair Treads

makeitwithkate

🪚 Transforming builder grade into modern colonial
🔨 DIY builds and decor
🪑 Furniture flips

Make it with Kate | DIY Blog
Sometimes, you just have to go for it. 🔨 🪚🪛
The number one question I got asked about this pro The number one question I got asked about this project was where this runner was from so I thought it deserved it’s own post: ✔️RUNNER DETAILS
.
.

❇️ it’s from Amazon…and it’s washable 🤯 you can find the link in my bio > shop my pictures OR by checking out my ‘stair runner’ highlight for the direct link
❇️ I bought two 2x12 runners and then cut the ends at a 45° angle and joined the seams with carpet joining tape for the turn (step by step in ‘stair runner’ highlight)
❇️ I have a rug pad cut into strips and attached with carpet tape to each tread under the runner, and the runner is attached with a staple gun- all of these also linked in my @liketoknow.it which can be found in my bio under shop my pictures
.
.
.
Any other questions I can answer??
Before >>>> After! Are you team carpet or team woo Before >>>> After! Are you team carpet or team wood?? This staircase makeover took a few days but it was quite the budget friendly makeover and I’m happy with the outcome! #diyhomedecor #diyprojects #staircasedesign #staircasemakeover
So tell me…are you team carpet or wood stairs?? So tell me…are you team carpet or wood stairs?? #staircasedesign #staircaserenovation #woodstairs
Adding this runner to the staircase really gave it Adding this runner to the staircase really gave it a nice finishing touch. See how I tackled the right turn in the staircase by cutting and joining the two runners. Find this runner linked in my @liketoknow.it
Here’s what the middle of this #staircasemakeove Here’s what the middle of this #staircasemakeover looks like! The treads are stained and we are making some DIY risers to give it a clean look. Lastly, they need trim and some final touches and they’ll be done! #staircasedesign #diyhomedecor #diyprojects
I really wanted to try to stain these pine treads I really wanted to try to stain these pine treads before just painting them black but my stain just wasn’t coming out right. I tried an idea and ran with it and I’m loving the look of this paint/gel stain combo! This is a progress reel…so let’s see if this plan sticks! Stay tuned :) #staircasedesign #gelstainstairs
I’ve been wanting to rip this carpet up for a wh I’ve been wanting to rip this carpet up for a while now….today is the day I decided I can’t wait any longer. I have more involved plans for this staircase so for now I’ll be doing a budget-friendly update here! Stay tuned to see how it turns out 🙃 #staircasedesign #diyhomedecor #diyprojects #staircaserenovation
I love the look of garland on a mirror, I think it I love the look of garland on a mirror, I think it adds a nice touch to my holiday decor! These @command hooks and clips are perfect for making this a nice easy project that packs a punch! #holidaydecor #christmasdecor #diyhomedecor
I thought I would try something new on my front po I thought I would try something new on my front porch this year because there are just too many holidays to decorate for in a row here. I got this prelit garland from #zulily to use as a base for my porch decor for these next few holidays. I kinda like how it turned out! Plus, I can light it up at night :) #ad #frontporchdecor #falloween #holidaydecor
The board and batten entryway is done! Well…stil The board and batten entryway is done! Well…still the last 5% to do but that’s how my projects go ;) What do you think about the color?? It’s Pashmina by @benjaminmoore #diyhomedecor #boardandbatten #diyblogger
This board and batten entryway is almost done! Che This board and batten entryway is almost done! Check out some tips and tool for paint prep, and painting! #boardandbatten #moderntraditional #modernfarmhouse
Load More... Follow on Instagram
Copyright © 2023 · Make it with Kate · Hearten Made ⟡
Cleantalk Pixel