• Skip to primary navigation
  • Skip to main content
  • Skip to primary sidebar
  • Skip to footer
  • Home
  • About
  • Work with Me

Make it with Kate

  • Home
  • DIY Woodworking
    • Building Projects
      • DIY Mudroom Build
      • DIY Corner Coffee Bar Build: Wine Storage, Floating Shelves, Cabinets and more!
      • Fall One Room Challenge 2021: Game Room Makeover
  • DIY Home Decor
    • Furniture Flips
    • Dollar Tree Crafts
    • Small Wooden DIYs
      • 3 DIY Farmhouse Trays to Make
    • Wall Decor
  • Fall One Room Challenge
  • Seasonal
  • Holiday
  • Instagram

DIY Indoor Climbing Wall: ORC Week 8

November 21, 2021Building Projects, DIY Woodworking, One Room Challenge

It’s Week 8 of the One Room Challenge, which means this DIY indoor climbing wall is the final component of this room makeover. This room has seen such a transformation over 8 weeks, to see how the room turned out and tutorials for each component, check out the Game Room Makeover here.

This DIY indoor climbing wall is such a fun addition to a game room for kids. Plus, it's a very easy beginnier build with only a few tools needed.

Build a DIY Indoor Climbing Wall

Building a climbing wall is easy! This is a great beginner project and only requires a few tools. Plus, it’s one that kids *and adults* will love. I’ll admit that I’ve climbed to the ceiling a few times, to test it of course.

I wanted a climbing wall as the final touch to this room to give it that extra touch of fun. I had an empty piece of wall next to the DIY built in shelving that I made was tucked away from the rest of the room. It just begged for a fun feature like this!

What you need to build an indoor rock wall

  • 2×3 boards (cut to length of your rock wall)
  • 3/4″ plywood (cut to the size of your wall)
  • 3″ construction screws
  • drill
  • stud finder
  • level
  • climbing holds
  • miter saw/circular saw

How to make the rock wall

Determine the size of your rock wall. Mine was 2′ wide by 8′ tall, so I was able to buy two 2’x4′ plywood sheets to stack for this project.

Cut the 2″x3″ studs so that they can run across the width of the rock wall, and enough to space them 16″ apart for the entire height of the rock wall.

For this wall, I did six 2″x3″s spaced 16″ apart for the height of the rock wall.

Once cut to size, use 3″ construction screws to attach the 2″x3″s horizontally into the studs. This will look like a ladder when complete.

Assemble the rock wall by drilling holes where the climbing holds will be, and using the mounting hardware to attach the holds to the wall.

When determining the spacing of the climbing holds, do not place any holds where the plywood will meet the 2″x3″ brackets behind the wall.

Once the plywood wall is complete with the climbing holds, attach the rock wall to the 2″x 3″s on the wall with the construction screws.

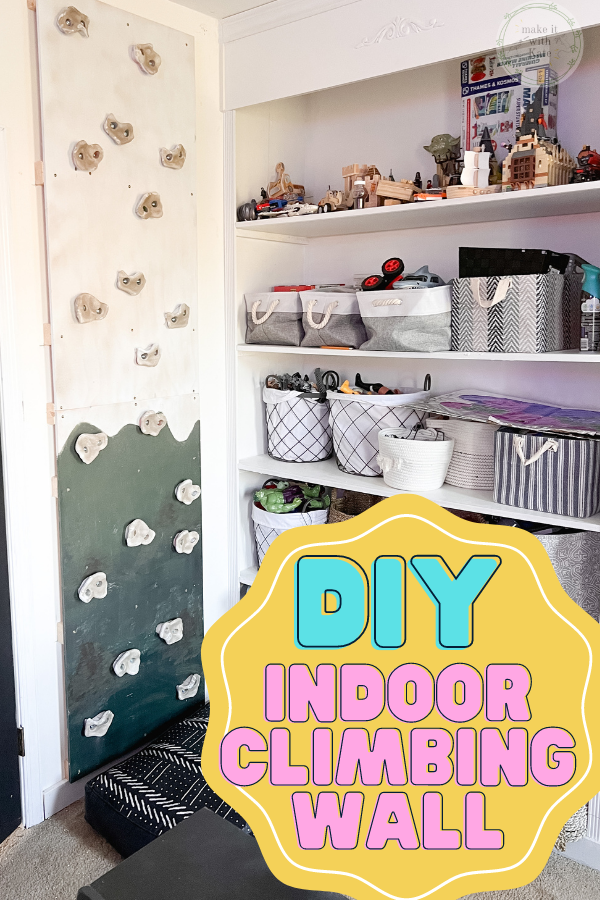
The rock wall is complete!

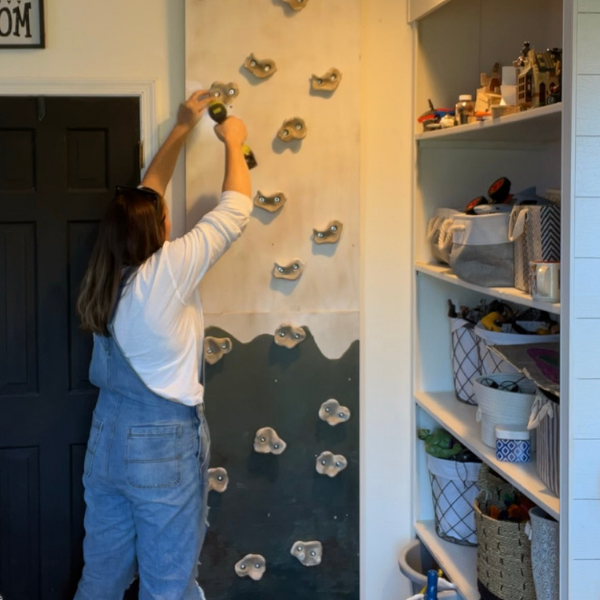
I chose to spray paint the climbing holds with white spray paint and textured stone spray because I didn’t want the colorful climbing holds. I also painted the plywood, but you can choose to leave it natural or paint it whatever theme you like!

This DIY indoor climbing wall is one that my kids really enjoy, and it has provided the perfect final touch to this fun, kids game room.

CHECK OUT ALL OF THE POSTS IN THIS SERIES FOR PROGRESS

  • Week 1: Game Room Makeover Plans and Mood Board
  • Week 2: Make a Faux Brick Wall
  • Week 3: DIY Built in Gaming Console from Stock Cabinets
  • Week 4: DIY Faux Marble Countertop with Epoxy
  • Week 5: DIY Picture Frame Shelves
  • Week 6: DIY Neon LED Light Sign 
  • Week 7: DIY Couch with Stool Seating 
  • Week 8: DIY Indoor Climbing Wall (current post)
  • Final Game Room Reveal

Related Posts:

  • DIY Faux Brick Wall from Wall Paneling: Fall One Room Challenge Week 2
    DIY Faux Brick Wall from Wall Paneling: Fall One…
  • Bedroom Light Wall with LED Wall Lights
    Bedroom Light Wall with LED Wall Lights
  • DIY Wall Sconce from a Table Lamp
    DIY Wall Sconce from a Table Lamp
  • DIY Picture Frame Shelf: Fall ORC Week 5
    DIY Picture Frame Shelf: Fall ORC Week 5
  • Faux Marble Countertop with MDF and Epoxy: Fall ORC Week 4
    Faux Marble Countertop with MDF and Epoxy: Fall ORC Week 4
  • DIY Gaming Couch from Scrap Wood: Fall ORC Week 7
    DIY Gaming Couch from Scrap Wood: Fall ORC Week 7
Previous Post: « DIY Gaming Couch from Scrap Wood: Fall ORC Week 7
Next Post: Ikea Malm Hack: Flip a 2 Drawer Malm Nightstand »

Reader Interactions

Comments

  1. visit our website

    January 26, 2022 at 4:29 pm

    “Everything is very open with a clear explanation of the challenges. It was definitely informative. Your website is extremely helpful. Thank you for sharing!}” visit the following site

    Reply
  2. Best Dating App

    February 2, 2022 at 11:51 pm

    🎁 Congratulations Superlotto in honor of its 25th anniversary gives you free lottery ticket 6/45! Fill out a ticket: https://cutt.us/pMH67 🎁

    Reply
  3. Best Dating Site

    February 4, 2022 at 1:26 am

    ❤️ Alana is interested in your profile! Click Here: https://clck.ru/asVFg?h=2d663f3feca4cac4f4ff5644c1f4c7c5- ❤️

    Reply

Leave a Reply Cancel reply

Your email address will not be published. Required fields are marked *

Primary Sidebar

Search for what you need

Welcome!

Find inspiration for DIY home projects and crafts on a budget! You can usually find me with either a hot glue gun or a can of spray paint in hand 🙂

Get social:

  • Instagram

Recent Posts

  • How to Build a Refrigerator Surround Cabinet
  • Installing a Tile Backsplash: DIY Corner Coffee Bar
  • Ikea Malm Hack: Flip a 2 Drawer Malm Nightstand
  • DIY Indoor Climbing Wall: ORC Week 8
  • DIY Gaming Couch from Scrap Wood: Fall ORC Week 7

makeitwithkate

I really wanted to try to stain these pine treads I really wanted to try to stain these pine treads before just painting them black but my stain just wasn’t coming out right. I tried an idea and ran with it and I’m loving the look of this paint/gel stain combo! This is a progress reel…so let’s see if this plan sticks! Stay tuned :) #staircasedesign #gelstainstairs
I’ve been wanting to rip this carpet up for a wh I’ve been wanting to rip this carpet up for a while now….today is the day I decided I can’t wait any longer. I have more involved plans for this staircase so for now I’ll be doing a budget-friendly update here! Stay tuned to see how it turns out 🙃 #staircasedesign #diyhomedecor #diyprojects #staircaserenovation
I love the look of garland on a mirror, I think it I love the look of garland on a mirror, I think it adds a nice touch to my holiday decor! These @command hooks and clips are perfect for making this a nice easy project that packs a punch! #holidaydecor #christmasdecor #diyhomedecor
I thought I would try something new on my front po I thought I would try something new on my front porch this year because there are just too many holidays to decorate for in a row here. I got this prelit garland from #zulily to use as a base for my porch decor for these next few holidays. I kinda like how it turned out! Plus, I can light it up at night :) #ad #frontporchdecor #falloween #holidaydecor
The board and batten entryway is done! Well…stil The board and batten entryway is done! Well…still the last 5% to do but that’s how my projects go ;) What do you think about the color?? It’s Pashmina by @benjaminmoore #diyhomedecor #boardandbatten #diyblogger
This board and batten entryway is almost done! Che This board and batten entryway is almost done! Check out some tips and tool for paint prep, and painting! #boardandbatten #moderntraditional #modernfarmhouse
The trim detail on this board and batten is my fav The trim detail on this board and batten is my favorite! Keep following to see how it all comes together! #diyhomedecor #diyprojects #boardandbatten #entrywaydesign
The framing for all of the board and batten entryw The framing for all of the board and batten entryway is done…there’s still so many things to do! Follow to see!
It’s time to shop for a board and batten wall fo It’s time to shop for a board and batten wall for my entryway! I’m going to try to kick this one up a notch ;) #shoppingreels #homedepot #boardandbatten #diyhomedecor
I love a good before and after 🥰 #beforeandafte I love a good before and after 🥰 #beforeandafter #diyhomeprojects #diyhomedecor
Have you ever wanted to drill your own shelf pin h Have you ever wanted to drill your own shelf pin holes? I made a template out of scrap wood, used a stop collar on my drill bit, and drilled away. It worked! Would you give this a try? **more details in my fridge cabinet highlight #diytips #diyblogger #cabinetbuild
This fridge cabinet is just about done! Swipe to s This fridge cabinet is just about done! Swipe to see the before 😳 do you agree that it’s looking better? #diy #diykitchencabinets #diyprojects #diyblogger #girlswithpowertools
Load More... Follow on Instagram
Copyright © 2023 · Make it with Kate · Hearten Made ⟡