• Skip to primary navigation
  • Skip to main content
  • Skip to primary sidebar
  • Skip to footer
  • Home
  • About
  • Work with Me

Make it with Kate

  • Home
  • DIY Woodworking
    • Building Projects
      • DIY Mudroom Build
      • DIY Corner Coffee Bar Build: Wine Storage, Floating Shelves, Cabinets and more!
      • DIY Living Room Projects: Built-ins, Wall Treatment, Beams, and More!
      • Staircase Makeover: Carpet to Wood Stairs
      • Fall One Room Challenge 2021: Game Room Makeover
  • DIY Home Decor
    • Furniture Flips
    • Dollar Tree Crafts
    • Small Wooden DIYs
      • 3 DIY Farmhouse Trays to Make
    • Wall Decor
  • Fall One Room Challenge
  • Seasonal
  • Holiday
  • Instagram

Game Room Makeover: Fall One Room Challenge 2021 (Week 1)

September 30, 2021DIY Home Decor, DIY Woodworking, One Room Challenge

I’m so excited to participate in the Fall One Room Challenge for 2021! I’ll be doing a game room makeover (and it will be ready just in time for Christmas). Included will be some much needed storage and organization and a handful of fun DIY projects.

This game room makeover is part of the One Room Challenge. It will include DIY building projects, wall treatment, and more! #oneroomchallenge #BHGORC #gameroommakeover #diyprojects

What’s the One Room Challenge?

The One Room Challenge happens twice a year in the Spring and the Fall, and is an online event where design influencers makeover entire rooms and document their progress on their blogs or on Instagram.

I’ll be participating here on my blog with weekly updates and projects throughout the 8 weeks, as well as in posting on my Instagram account. (If you aren’t following me on IG, head over and follow because I post almost daily on stories with tutorial and walk throughs of various projects).

I encourage you to check out the One Room Challenge site and browse the blog there as well, you will find so much inspiration from fellow designers and DIYers!

Game Room Makeover Plan and Budget

I know you’re probably ready to know what the space currently looks like and what my plan is! I can’t wait to add some functionality to this space.

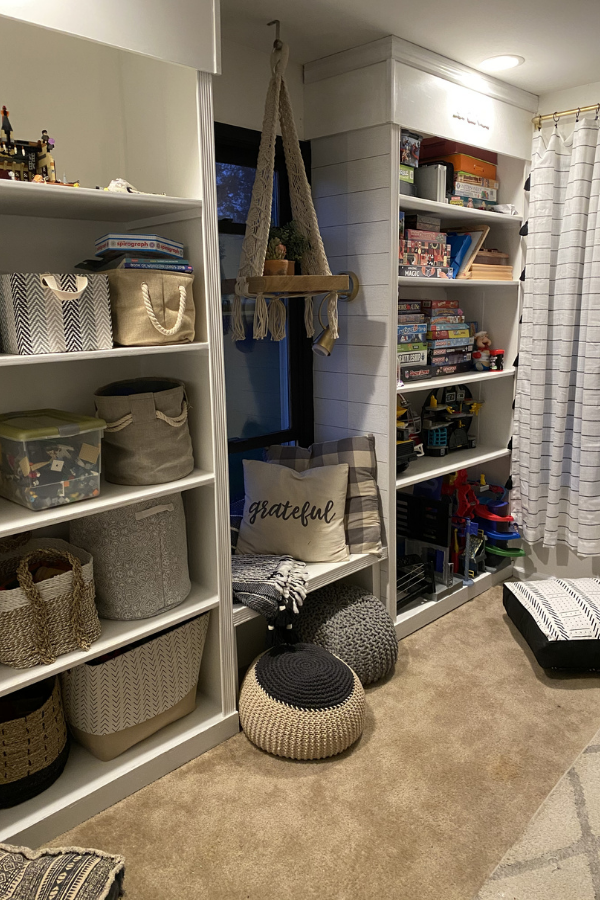
This room was actually the location of my very first DIY project in this house, I made DIY Built-in Shelving for board games and baskets of kids toys.

However, the other side of the room is the video game and art display area, and it’s a disaster. I’m ready to tackle it and make the whole room complete!

Game Room Before

I feel like I need a disclaimer for this picture, I didn’t clean up the space because I wanted to show you how it looks on a ‘normal’ day. This will give you a sense of why I’m building the space that I am planning.

When planning out a project I make a bulleted list of what the space is used for, exactly what is currently being stored there, etc. This way, in my planning I can incorporate all of these into the build.

I know, it’s bad.

In taking inventory of this space, I need:

  • sufficient counter space for easy charging of consoles and controllers for video games
  • bins for video games
  • seating
  • art storage
  • artwork display
  • desk seating

And here is the wall opposite this one where I did the built in shelving.

Let’s make these two walls match a bit better!

New Game Room Makeover Design

I’m so excited about this new game room makeover design, it will add storage and functionality and will be really streamlined (and cool).

My kids are currently 6, 8 and 10 and my hope is that the design will carry them through the next handful of years of entertaining friends and hanging out together.

Game Room Design Mockup

This game room makeover is part of the One Room Challenge. It will include DIY building projects, wall treatment, and more!

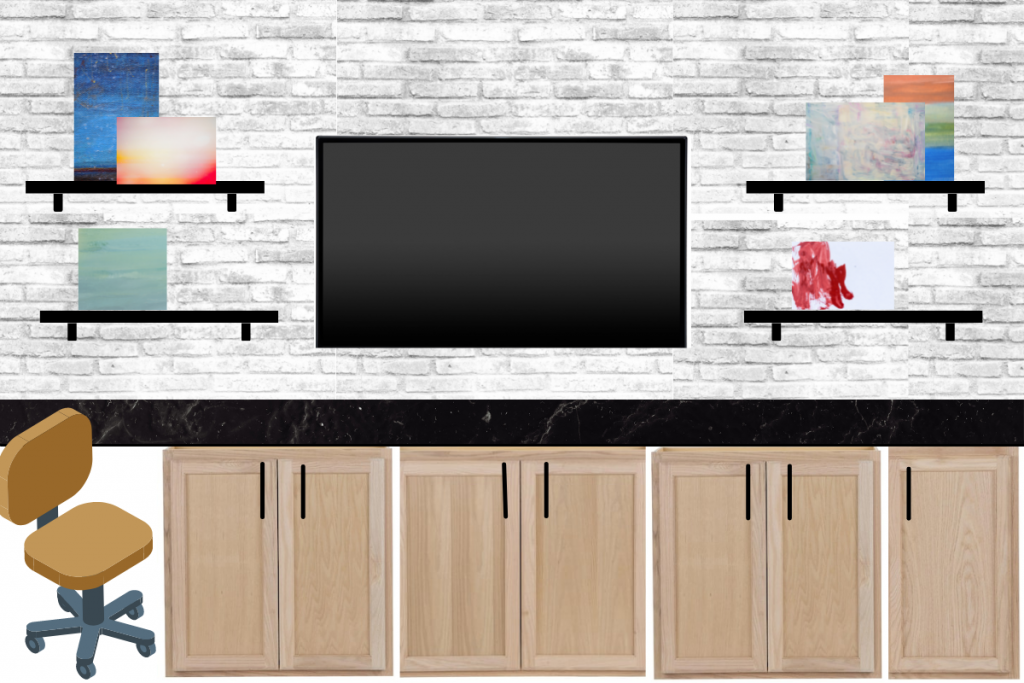
The new plan will include a wall to wall built in for desk space and storage, along with artwork display and a ‘brick’ wall.

There will be a handful of DIY projects to tackle here to make this space pretty on a budget. Included will be:

  • DIY built in media console and desk
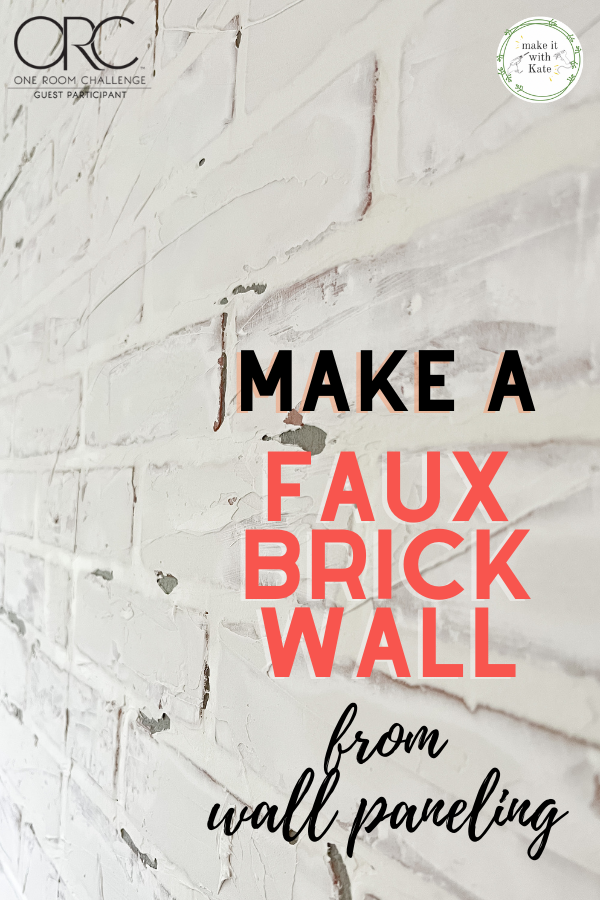
  • faux brick wall
  • DIY picture frame shelving
  • DIY faux marble countertop
  • (possibly an interior french door makeover)

I hope you join along the next 8 weeks to see the transformation of this room!

Game Room Makeover Budget

I’ll be honest I don’t love talking about money, but, I do know that part of hoping to inspire you to try DIY projects in your own home is giving you an idea of what things cost (and showing you how you can make a big impact on a budget).

So, here is the rough breakdown, and yes, I almost always go over budget so I know budget for extras that I don’t know about yet, ha!

  • unfinished wall cabinets = $310
  • faux brick panels = $115
  • joint compound/liquid nails/etc = $30
  • hardware = $20
  • plywood = $60
  • paint/epoxy/supplies = $50

Total = $585 (rounding up to $600 for small extras)

I’ll be doing this project over 8 weeks as part of the one room challenge, so this helps me break down the budget to spread to out over time as well!

Considering that if I had to have a 12′ console built for this space it would cost much more than that alone, this will be a budget friendly way to renovate this space!

This game room makeover is part of the One Room Challenge. It will include DIY building projects, wall treatment, and more!

Check out all of the posts in this series for progress

  • Week 1: Game Room Makeover Plans and Mood Board (current post)
  • Week 2: Make a Faux Brick Wall
  • Week 3: DIY Built in Gaming Console from Stock Cabinets
  • Week 4: DIY Faux Marble Countertop with Epoxy
  • Week 5: DIY Picture Frame Shelves
  • Week 6: DIY Neon LED Light Sign
  • Week 7: DIY Couch with Stool Seating
  • Week 8: DIY Indoor Climbing Wall
  • Final Game Room Reveal

Related Posts:

  • DIY Living Room Projects: Built-ins, Wall Treatment, Beams, and More!
    DIY Living Room Projects: Built-ins, Wall Treatment, Beams,…
  • Staircase Makeover: Carpet to Wood Stairs
    Staircase Makeover: Carpet to Wood Stairs
  • 7 Easy DIY Fall Centerpieces
    7 Easy DIY Fall Centerpieces
  • Fall House Decoration to Add Warmth
    Fall House Decoration to Add Warmth
Previous Post: « How to Paint a Brass Fireplace: Quick and Easy
Next Post: DIY Faux Brick Wall from Wall Paneling: Fall One Room Challenge Week 2 »

Reader Interactions

Comments

  1. brick veneer

    January 24, 2022 at 7:55 am

    This is really interesting, You are a very skilled blogger.

    I’ve joined your feed and look forward to seeking more of
    your wonderful post. Also, I’ve shared your web site in my social networks!

    Reply

Trackbacks

  1. Built-in Gaming Console with Stock Cabinets - Fall ORC Week 3 - Make it with Kate says:
    October 28, 2021 at 6:02 pm

    […] Week 1: Game Room Makeover Plans and Mood Board […]

    Reply
  2. Painted Leather Chairs: Updating Outdated Leather - Make it with Kate says:
    October 29, 2021 at 5:48 pm

    […] They have been the perfect addition to my game room makeover. […]

    Reply

Leave a Reply Cancel reply

Your email address will not be published. Required fields are marked *

Primary Sidebar

Search for what you need

Welcome!

Find inspiration for DIY home projects and crafts on a budget! You can usually find me with either a hot glue gun or a can of spray paint in hand 🙂

Get social:

  • Instagram

Recent Posts

  • Double Picture Frame Moulding DIY
  • 7 Easy DIY Fall Centerpieces
  • Fall House Decoration to Add Warmth
  • DIY Stair Runner with Corner Turn
  • DIY Stair Risers on a Budget

makeitwithkate

🪚 Transforming builder grade into modern colonial
🔨 DIY builds and decor
🪑 Furniture flips

Make it with Kate | DIY Blog
These motorized roller shades from @smartwingshome These motorized roller shades from @smartwingshome are the final missing piece to this living room makeover! I just love how easy they are to use with the remote or as part of my home automation. The color is the perfect neutral and the linen provides great light-filtering. These are the SmartWings Motorized Light Filtering Roller Shades 70% Blackout Linen, color Caramel.
🌟🌟 L I V I N G  R O O M  R E V E A L 🌟🌟 what’s new? Wall treatment, door and window trim, stained beams, updated doors, lighting and paint! DIY is too much fun 🥰 do you have a favorite part? ➡️➡️ swipe to see some progress/before pics! #diyhome #livingroomdecor #moderntraditional #diydecor
🌟The living room I bought versus the one I crea 🌟The living room I bought versus the one I created. 🌟 The number one thing I’ve learned in DIY, is to follow and know the trends, but ultimately find your own style and create what you love, and what you are your family are comfortable in. #diy #diyhome #livingroom #moderntraditional
Here are 5 tips for styling your shelves! 👇

1️⃣ Balance: vary shapes, sizes, and height to create visual interest

2️⃣ Color Coordination: You can group similar colors together or use gradients of a color palette. An easy way to do this is to stick with either warm or cool tones.

3️⃣ Layering: Place larger items at the back and smaller items in front to create depth and visual intrigue, or small items on top of large. 

4️⃣ Negative Space: Leave some empty space to allow the eye to rest and to highlight the items you’ve chosen to display.

5️⃣ Personal Touches: Incorporate items personal to you such as photos, artwork, or keepsakes to make the shelves feel more personal and reflective of your style and interests.
I’m loving how fresh this living room feels now! I’m loving how fresh this living room feels now! #diyhome #moderntraditional #livingroom #diydesign
These doors are DONE! This was a labor of love but These doors are DONE! This was a labor of love but I am happy with how they turned out! The reeded film over the plexiglass keeps the playroom mess out of sight, but the room feels a bit more open this way. More details in highlights! #diyhome I used @retiqueliquidwood to cover the chalk paint without any sanding!
Taking these doors from painted and scratched to w Taking these doors from painted and scratched to wood-grained French doors with @retiqueliquidwood - they are almost done, stay tuned for the end result! I think they will be good! #diydoors
I’m making progress in this living room! Next st I’m making progress in this living room! Next step is to take these beat up, painted doors and make them look like new French doors! I cut large holes in the middle of them and am going to make a plexiglass insert. Here’s hoping!
Let’s take these beams from painted black to a b Let’s take these beams from painted black to a barn wood look. Check out this fun and easy process! What do you think?!
Picture frame moulding in the living room phase 1! Picture frame moulding in the living room phase 1! I updated the door and window trim to a craftsman style, the added double box moulding to the walls, and board and batten to the breakfast bar. Stay tuned to watch this get finished! It’s gonna be good!
I’m switching out the trim work in my living roo I’m switching out the trim work in my living room to add Craftsman moulding to the doorway and window! This is part of a living room refresh, stay tuned for box moulding and updated doors and beams next! #craftsmantrim #craftsmanmoulding #doortrim #diy #doityourself
Sometimes, you just have to go for it. 🔨 🪚🪛
Load More... Follow on Instagram
Copyright © 2025 · Make it with Kate · Hearten Made ⟡
Cleantalk Pixel